What is a field?
A field is a placeholder for dynamic data. When the data that the field links to changes, the text in the field is automatically updated.
For example, a field could be inserted into a text block or a table cell linking to the current period end date. When the current period end date changes, the value shown in the field will automatically update. This means the report content updates itself, so the does not need to find all instances of the date and manually update them.
How do fields work?
The following explains the functionality of fields.
Example
When a field is inserted that links to a cell within table, the field is not locked to that cell. If the table structure changes, it is possible the field will then link to a different cell. Therefore, a warning message is shown when table structures are changed.
In the following image the field in the text block links to the yellow cell in the user inserted table beneath it. The field links to the 3rd row and the 2nd column.

The rows with 'Row 1' and 'Row 2' in them are the Introduction for the table and this can be turned off in the table settings. Turning the introduction off would produce the following outcome.
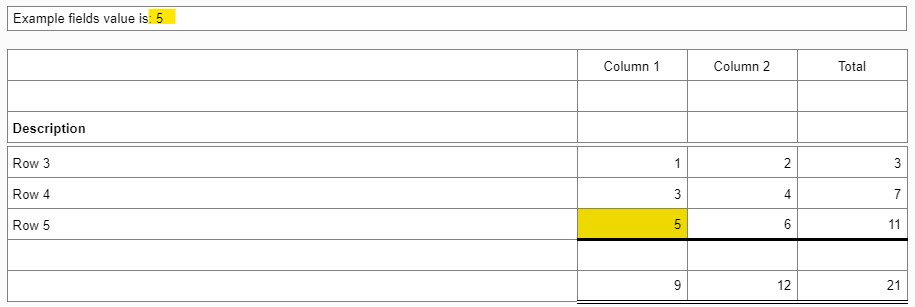
Note that the field still links to 3rd row and the 2nd column.
Fields and Import report
It is possible when using Import report that the fields will link to tables which do not exist in the destination report. In this case #ERROR will be shown in the fields that cannot find the source of the field.
Pasting data into a table containing fields
A field is treated like a locked cell when data is pasted into a table. If a field is no longer required and data needs to be pasted in the table, delete the field first.
Fields values and formats
If a report is rounded to whole units and a cell value is 1,234,000 and that cell is used in a field in a text block, the field will show as 1,234,000. Updating the report rounding to thousands means the cell value would update to 1,234 and the field value would also update to 1,234.
Importing disclosures
A field is treated like a locked cell when data is imported into a table using Inputs > Disclosures. If a field is no longer required and data needs to be imported into a table, delete the field in the table first. This means any cell with data in the disclosures file will be ignored when imported, if in the destination table the corresponding cell is a field.
Roll forward
- Fields in numeric cells will not roll to the prior period
- Where applicable, fields in text cells will roll to the prior cell
Adding fields to a table
Fields cannot be inserted into chart of accounts descriptions and date cells.
Fields can be formatted with text styles, such as bold. Styles apply to the whole field, it is not possible to partially format fields.
Inserting fields
- Click a table to edit
- Select the Fields drop down menu, then select Insert formula, Insert field or AutoSum
- Alternatively, right mouse click where the field should be inserted and click Insert field or Insert formula
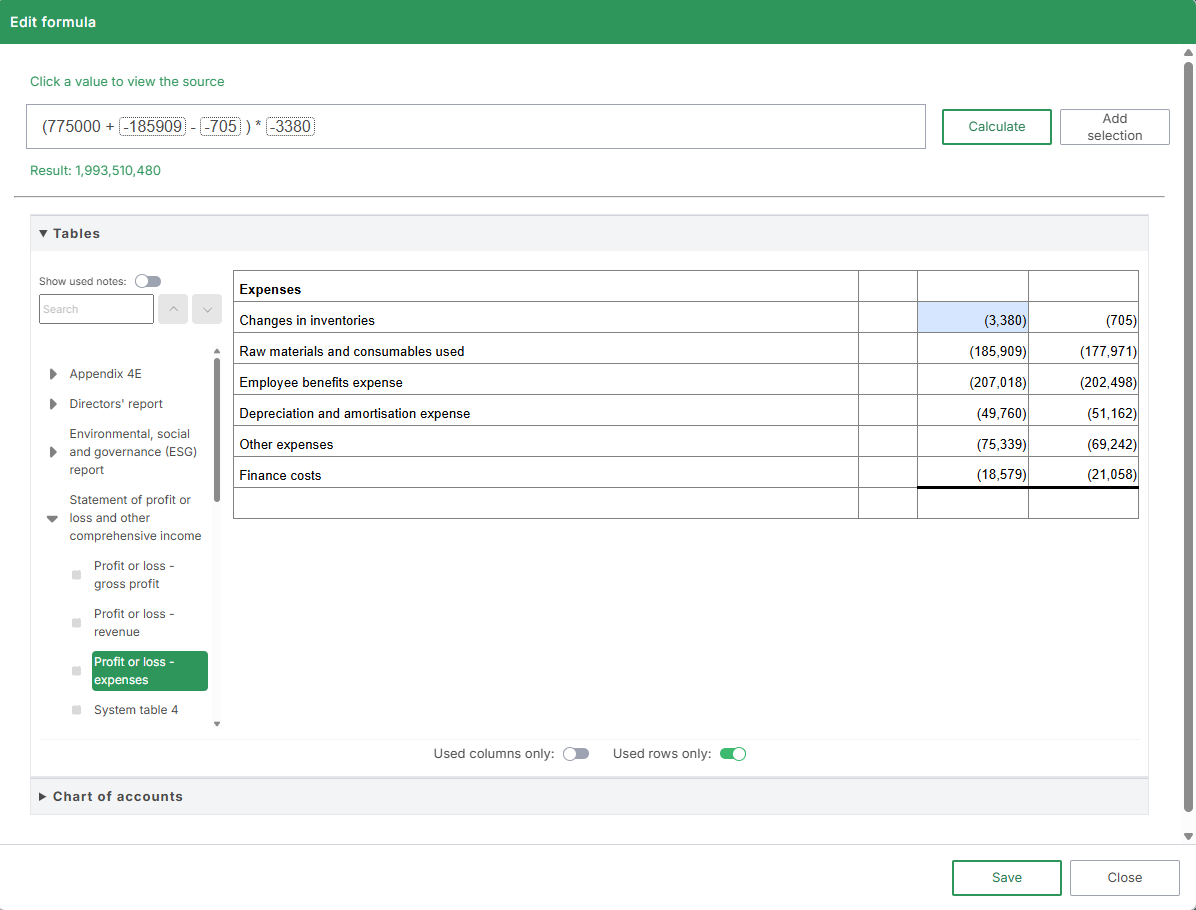
Insert formula
Formula fields can be linked to tables, chart of accounts or trial balance accounts (see below).They can also be manually entered into the formula bar.
Tables
Table headers cannot be used to insert formula fields.
- In the Insert formula screen, select the Tables drop down menu
- Select a table from the list. The table can be found by searching the table name. There is a default list of tables that have been automatically named by the software. The remaining system tables in the report are named sequentially according to the order it appears in the note. Alternatively, find the table by selecting the relevant section and note that the table appears in.
- Select the cell, then Add selection. The cell will be added to the formula bar.
- Type the formula into the formula bar. Tip: To flip the sign of a balance, type the negative sign (-) before the balance in the formula bar.
- Select another cell, then Add selection again to include it in the formula. Cells can be added from different tables, from the Chart of accounts allocation codes or from Trial balance accounts.
- Click Calculate to view the result of the formula
- Alternatively, click Save to add the result as a field
Note: If only the balance of a cell is to be inserted as a field (i.e. no formula is required), select the cell from the table as normal, then Add selection. Click Save and the cell will be inserted as a field.
Chart of accounts
Table headers cannot be used to insert formula fields.
- In the Insert formula screen, select the Chart of accounts drop down menu
- Select the cell, then Add selection. The cell will be added to the formula bar.
- Type the formula into the formula bar. Tip: To flip the sign of a balance, type the negative sign (-) before the balance in the formula bar.
- Select another cell, then Add selection again to include it in the formula. Cells can be added from other Chart of accounts allocation codes, from Tables or from Trial balance accounts.
- Click Calculate to view the result of the formula
- Alternatively, click Save to add the result as a field
Note: Select Used allocations only to hide the unused allocations.
If only the balance of an allocation code is to be inserted as a field (i.e. no formula is required), select the cell from the table as normal, then Add selection. Click Save and the cell will be inserted as a field.
Table headers cannot be used to insert formula fields.
- In the Insert formula screen, select the Trial balance drop down menu
- Select the trial balance account, then Add selection. The balance will be added to the formula bar.
- Type the formula into the formula bar. Tip: To flip the sign of a balance, type the negative sign (-) before the balance in the formula bar.
- Select another trial balance account, then Add selection again to include it in the formula. Cells can be added from Chart of accounts allocation codes or from Tables
- Click Calculate to view the result of the formula
- Alternatively, click Save to add the result as a field
Note: It is possible to filter the trial balance to find the required account.
If only the balance of the trial balance account is to be inserted as a field (i.e. no formula is required), select the cell from the table as normal, then Add selection. Click Save and the cell will be inserted as a field.
Insert field
Tables
Table headers cannot be used to insert Table fields.
- In the Insert field screen, select the Tables drop down menu
- Select a table from the list. The table can be found by searching the table name. There is a default list of tables that have been automatically named by the software. The remaining system tables in the report are named sequentially according to the order it appears in the note. Alternatively, find the table by selecting the relevant section and note that the table appears in.
- Select the cell, then click Save
Note
Table headers cannot be used to insert Note fields.
- In the Insert field screen, select the Note drop down menu
- Click the note to insert as a field
- To include the word 'note' before the note number, tick Include the word 'note'
- To include the note number before the note name, tick Include the note number
- To include the note name after the note number, tick Include the note name
Note: Select Used notes only to hide the unused notes.
Variable
- In the Insert field screen, select the Variable drop down menu
- Click the variable to insert as a field
- Click the Edit button to edit variable value
Conditional variables analyse the column content and change wording based on their values. For example, when all columns are positive, the field may say 'Profit'. When the column values change to positive and negative, the field may say 'Profit/Loss'.
- In the Insert field screen, select the Conditional drop down menu
- Click the conditional variable to insert as a field
- Click the Edit button to edit the conditional variable value
Note: Table headers cannot be used to insert Conditional fields.
Custom variable
- In the Insert field screen, select the Custom variable drop down menu
- Click the custom variable to insert as a field
- Click the New button to add new custom variables
- Click the Edit button to edit custom variables
- To add, edit or delete custom variables click Inputs > Variables
AutoSum
This option is only available when groups of cells have been selected. The AutoSum option will automatically sum groups of cells by inserting multiple addition formula fields into a table at once.
To AutoSum columns:
- Click a table to edit
- From the table, select the cells to sum using SHIFT plus click
- Under the Fields drop down menu, click AutoSum
- Select the desired position of the Formula fields being inserted, either Below or Both
- Select the tickboxes above the columns to include them in the total formula
To AutoSum rows:
- Click a table to edit
- From the table, select the cells to sum using SHIFT plus click
- Under the Fields drop down menu, click AutoSum
- Select the desired position of the Formula fields being inserted, either Right or Both
- Select the tickboxes next to the rows to include them in the total formula
Note: When selecting the desired position of the Formula fields being inserted, the Right and Both options will be disabled if the column to the right of the selection is not editable or if the column has the wrong data type selected (for example, if the column data type is Text). If the row below the selection is not editable, the Below and Both options will be disabled.
Prefix and suffix
Fields can have a prefix or suffix added to them. For example, if a currency cell from a table is inserted as a field, the prefix could be the local currency symbol.
Prefixes and suffixes are not available in numeric cells.
Case
The case of fields can be set to:
- Default - no changes made
- Lowercase - all text is converted to lowercase
- Sentence case - first character of the first word is converted to uppercase, all other characters are converted to lower case
- Proper case - first character of each word is converted to uppercase, all other characters are converted to lower case
- Uppercase - all text is converted to uppercase
- Capitalise first character - first character of the first word is converted to uppercase, no changes made to all other characters
Note: Case does not change the case of the prefix and suffix.
Example
Below is an example of a system table with chart of accounts items, where a subtotal is required in the middle. This can be achieved by inserting a table and using fields to populate the numbers. Then insert balance checks to ensure there is a warning if other allocations are used in the future.


Unlocking total and subtotal cells in tables
Total and subtotal cells in tables can be unlocked. Unlocked cells will be converted to Formula fields, which can be edited.
To unlock a cell:
- Select the cell containing the total or subtotal
- Alternatively, select a range of cells containing totals or subtotals by SHIFT + Click
- Select the Fields drop down menu, then select Convert to field
- The cell will convert to a Formula field and the editable cell icon will display
- The field can be edited as normal
Adding fields to a text block
Fields can be formatted with text styles, such as bold. Styles apply to the whole field, it is not possible to partially format fields.
Inserting fields
- Click a text block to edit
- Select the Fields drop down menu, then select Insert formula or Insert field
- Alternatively, right mouse click where the field should be inserted and click the Insert formula or Insert field
Insert formula
Formula fields can be linked to tables or chart of accounts (see below).They can also be manually entered into the formula bar.
Tables
- In the Insert formula screen, select the Tables drop down menu
- Select a table from the list. The table can be found by searching the table name. There is a default list of tables that have been automatically named by the software. The remaining system tables in the report are named sequentially according to the order it appears in the note. Alternatively, find the table by selecting the relevant section and note that the table appears in.
- Select the cell, then Add selection. The cell will be added to the formula bar.
- Type the formula into the formula bar. Tip: To flip the sign of a balance, type the negative sign (-) before the balance in the formula bar.
- Select another cell, then Add selection again to include it in the formula. Cells can be added from different tables, from the Chart of accounts allocation codes or from Trial balance accounts.
- Click Calculate to view the result of the formula
- Alternatively, click Save to add the result as a field
Note: If only the balance of a cell is to be inserted as a field (i.e. no formula is required), select the cell from the table as normal, then Add selection. Click Save and the cell will be inserted as a field.
Chart of accounts
- In the Insert formula screen, select the Chart of accounts drop down menu
- Select the cell, then Add selection. The cell will be added to the formula bar.
- Type the formula into the formula bar. Tip: To flip the sign of a balance, type the negative sign (-) before the balance in the formula bar.
- Select another cell, then Add selection again to include it in the formula. Cells can be added from other Chart of accounts allocation codes, from Tables or from Trial balance accounts.
- Click Calculate to view the result of the formula
- Alternatively, click Save to add the result as a field
Note: Select Used allocations only to hide the unused allocations.
If only the balance of an allocation code is to be inserted as a field (i.e. no formula is required), select the cell from the table as normal, then Add selection. Click Save and the cell will be inserted as a field.
Trial balance
Table headers cannot be used to insert formula fields.
- In the Insert formula screen, select the Trial balance drop down menu
- Select the trial balance account, then Add selection. The balance will be added to the formula bar.
- Type the formula into the formula bar. Tip: To flip the sign of a balance, type the negative sign (-) before the balance in the formula bar.
- Select another trial balance account, then Add selection again to include it in the formula. Cells can be added from Chart of accounts allocation codes or from Tables
- Click Calculate to view the result of the formula
- Alternatively, click Save to add the result as a field
Note: It is possible to filter the trial balance to find the required account.
If only the balance of the trial balance account is to be inserted as a field (i.e. no formula is required), select the cell from the table as normal, then Add selection. Click Save and the cell will be inserted as a field.
Decimals
Under Number of decimals, specify the number of decimal places for the resulting formula field.
Insert field
Table
- In the Insert field screen, select the Tables drop down menu
- Select a table from the list. The table can be found by searching the table name. There is a default list of tables that have been automatically named by the software. The remaining system tables in the report are named sequentially according to the order it appears in the note. Alternatively, find the table by selecting the relevant section and note that the table appears in.
- Select the cell, then click Save
Notes
- In the Insert field screen, select the Note drop down menu
- Click the note to insert as a field
- To include the word 'note' before the note number, tick Include the word 'note'
- To include the note number before the note name, tick Include the note number
- To include the note name after the note number tick Include the note name
Note: Use the filter to show either All or Used notes.
Variable
- In the Insert field screen, select the Variable drop down menu
- Click the variable to insert as a field
- Click the Edit button to edit variable value
Custom variable
- In the Insert field screen, select the Custom variable drop down menu
- Click the custom variable to insert as a field
- Click the New button to add new custom variables
- Click the Edit button to edit custom variables
- To add, edit or delete custom variables click Inputs > Variables
Prefix and suffix
Fields can have a prefix or suffix added to them. For example, if a currency cell from a table is inserted as a field, the prefix could be the local currency symbol.
Case
The case of fields can be:
- Default - no changes made
- Lowercase - all text is converted to lowercase
- Sentence case - first character of the first word is converted to uppercase, all other characters are converted to lower case
- Proper case - first character of each word is converted to uppercase, all other characters are converted to lower case
- Uppercase - all text is converted to uppercase
- Capitalise first character - first character of the first word is converted to uppercase, no changes made to all other characters
Note: Case does not change the case of the prefix and suffix.
Creating formula fields with negative cell balances
When inserting a formula field, negative cell balances will be inserted with the negative sign (-). To create formulas, the addition, subtraction, multiplication and division symbols must still be entered to create the formula. For example:
Errors
- A table cell used for a field has since been deleted
- A custom variable used for a field has since been deleted
- The table the field links to has no name
Editing fields
- Double click it or;
- Right mouse click the field and click Edit field or;
- Select the field, click the Fields drop down menu, then click Edit field or;
- Press the = key when in numeric cells
Deleting fields
- Click the field, then press the delete key or;
- Right mouse click the field and click Delete field or;
- Select the field, click the Fields drop down menu, then click Delete field
What is a circular reference?
A circular reference happens when a field in a cell refers to itself either directly or indirectly.
The following image shows an example of a circular reference. The #ERROR cell has a field within it linking to the total column for the same row. That is not possible and so the #ERROR is shown.

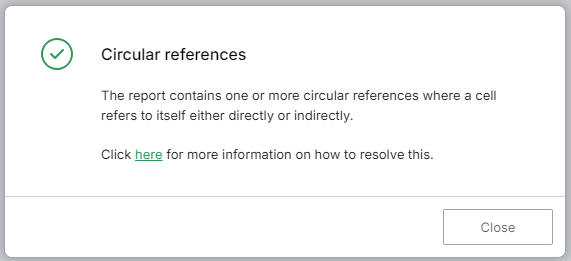
How to resolve circular references after opening a report
If a report contains a circular reference, the following screens will show automatically when the report is opened.

The screen shows all fields which contain circular references, including:
- Note - the note the circular reference is in
- Table name - the name of table the circular reference is in
- Row - the row number in the table the circular reference is in, with the text description in brackets
- Column - the column number in the table the circular reference is in
The following options are available to resolve a circular reference:
- Delete all circular references. This will delete all fields which are listed.
- Edit the circular reference. This will show the edit field screen, so a new cell can be selected for the field value. Once edited, the report will recalculate to check for circular references that still exist.
- Delete the circular reference. Once deleted, the report will recalculate to check for circular references that still exist.
It is also possible to ignore the circular reference by clicking any menu option in Accurri. This is not recommended as it will leave the circular references and will result in unexpected report calculations.