Video help
In this video:
- Creating adjustments
- Audit Trail - On screen
- Audit Trail - Comprehensive
- Import adjustments
- Roll forward
Jump to a specific point in the video with the chapters button in the video.
Adjustments features
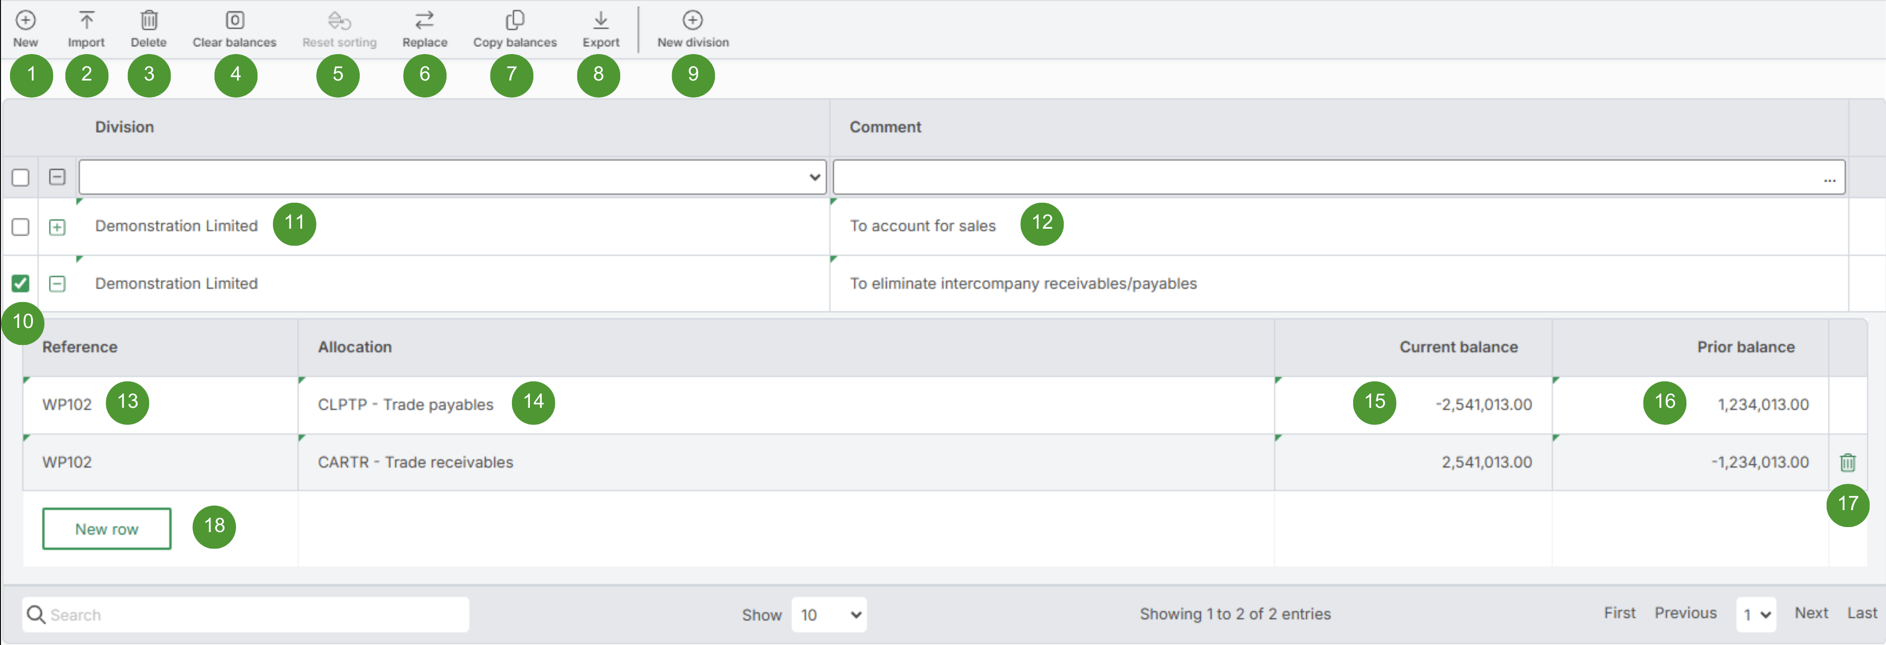
| Option | Function | Notes | |
| 1 |
New |
Adds a new adjustment |
|
| 2 |
Import |
Import a list of adjustments from Excel |
|
| 3 |
Delete |
Delete adjustments |
|
| 4 |
Clear balances |
Sets balances to zero |
|
| 5 |
Reset sorting |
Resets sorting to the default |
|
| 6 |
Replace |
Find and replace allocations |
|
| 7 |
Copy balances |
Copy the prior balance to the current balance |
|
| 8 |
Export |
Export to Excel |
|
| 9 |
New division |
Adds a new consolidation division |
|
| 10 |
Select |
Selects the adjustment |
|
| 11 |
Division name |
Displays the division name |
|
| 12 |
Comment |
Adjustment comments |
|
| 13 |
Reference |
Adjustment reference |
|
| 14 |
Allocation |
Adjustment allocation |
|
| 15 |
Current balance |
Current balance value |
|
| 16 |
Prior balance |
Prior balance value |
|
| 17 |
Delete adjustment row |
Delete the adjustment row clicked |
|
| 18 |
New row |
Adds a new row to the adjustment |
Warnings
The following warnings may be shown on the Adjustments screen:
- If any period does not balance, a balance warning will be displayed at the top of the screen, one warning for each period that does not balance
- If any period with a balance, has an allocation of 'UNSET - Unallocated account', an UNSET warning will be displayed
Sorting
The default sort order is the order in which the adjustments were created.
To change the sort order, click any column header. To sort by more than one column hold down SHIFT and click on the other columns you wish to sort by.
Adjustments examples
The following image shows an example of five adjustments which have been entered across multiple divisions:


Adjustments import format
Create an import template file
To create an Excel file for importing adjustments:
- Click Inputs > Adjustments
- Click the Export button to create a template file
The Export button will only be enabled if there is an adjustment. To force it to enable when there are no existing adjustments click the New button, type a comment and click OK. The Export button will then be enabled.
Importing adjustments
The following format does not apply to Interim Reports, see the next example Importing adjustments (Interim Report only).
To import adjustments:
- Create an import template file
- Click the Import button
- Tick Delete existing adjustments to delete all existing adjustments
- Click OK
- Cells A1 to A3 will be automatically populated when Export is used. When importing, these cells are ignored and can be blank
- The column headers must always start at row 5
- Separate each adjustment with a blank row, as shown in rows 8 and 11 in the image below
| Column A | Column B | ColumnC | Column D | Column E | Column F | Column G | Column H | |
| Column |
Adjustment number |
Division name or division alias |
Reference |
Allocation |
Description |
Current balance |
Prior balance |
Comments |
| Required |
Optional |
Required |
Optional |
Optional |
Optional |
Optional |
Optional |
Required |
| Header |
# |
Division |
Ref |
Allocation |
Description |
Bal - current |
Bal - prior |
Comments |
| Notes |
Leave blank if unused |
Full division name or the division alias |
Leave blank if unused |
Leave blank if unused |
Description will populate from the allocation when imported |
If blank and an allocation is present, it will import 0.00 |
If blank and an allocation is present, it will import 0.00
|
Required for the first Adjustment in each group
|
The following image shows a valid sample file:

Note: The comments cells are merged when the file is created by clicking Export. The cells do not have to be merged for the file to be valid.
Importing adjustments (Interim Report only)
To import adjustments:
- Create an import template file
- Click the Import button
- Tick Delete existing adjustments to delete all existing adjustments
- Click OK
- Cells A1 to A3 will be automatically populated when Export is used. When importing, these cells are ignored and can be blank
- The column headers must always start at row 5
- Separate each adjustment with a blank row, as shown in rows 8 and 11 in the image below
| Column A | Column B | Column C | Column D | Column E | Column F | Column G | Column H | Column I | |
| Column |
Adjustment number |
Division name or division alias |
Reference |
Allocation |
Description |
Current balance |
Prior balance |
Annual balance |
Comments |
| Required |
Optional |
Required |
Optional |
Optional |
Optional |
Optional |
Optional |
Optional |
Required |
| Header |
# |
Division |
Ref |
Allocation |
Description |
Bal - current |
Bal - prior |
Bal - annual |
Comments |
| Notes |
Leave blank if unused |
Full division name or the division alias |
Leave blank if unused |
Leave blank if unused |
Description will populate from the allocation when imported
|
If blank and allocation is present, it will import 0.00 |
If blank and allocation is present, it will import 0.00 |
If blank and allocation is present, it will import 0.00 |
Required for the first Adjustment in each group |
The following image shows a valid sample file:

Note: The comments cells are merged when the file is created by clicking Export. The cells do not have to be merged for the file to be valid.
Import errors
There are several types of error that could occur while importing adjustments:
- Incorrect number of columns
- Adjustments import file contains hidden columns
- Division in column B is blank or contains an invalid division name or alias
- Invalid allocation in column D
- Comments are blank
- More than 600 characters in the comments
- A message is shown stating there the file contains no data to import, check the header in row 5 is exactly as shown in the image above