Accurri extras
|
|
|
|
Video help
In this video:
- Sorting report sections
- Sorting Directors' report
- Sorting Balance sheet
- Sorting notes
- Sorting table rows
- Sorting table columns
Jump to a specific point in the video with the chapters button in the video.
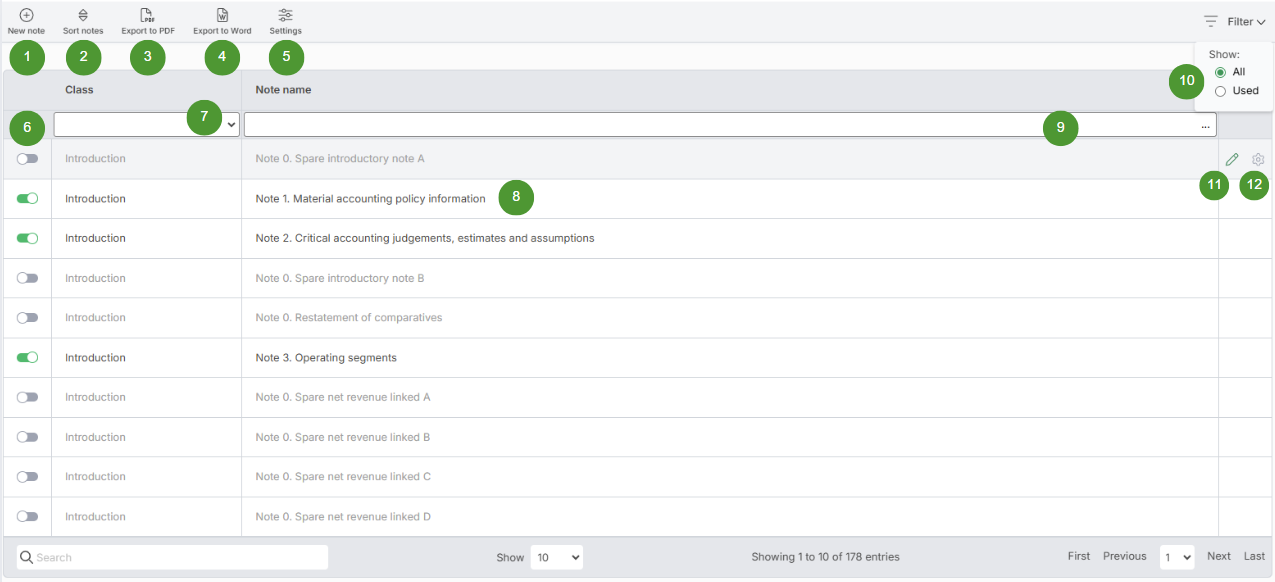
Notes list features

| Option | Function | Notes | |
| 1 |
New note |
Adds a new note |
|
| 2 |
Sort notes |
Sort the notes |
|
| 3 |
Export to PDF |
Download all notes to PDF file |
|
| 4 |
Export to Word |
Download all notes to Word file |
|
| 5 |
Settings |
General settings for all notes |
|
| 6 |
Turn note on and off |
Turn notes on and off |
|
| 7 |
Sections |
Select different sections of the notes |
|
| 8 |
Edit note |
Opens the note for editing |
|
| 9 |
Search |
Searches all notes |
|
| 10 |
Show all or used |
Shows all or only used notes |
|
| 11 |
Edit note |
Opens the note for editing |
|
| 12 |
Settings |
General settings for the note |
Viewing notes
To view all the notes to the financial statements:
- Navigate to Sections > Notes > All notes or;
- Under Sections > Notes, select the relevant category in the navigation menu to view all notes within that category
It is possible to hide the unused notes within categories in the navigation menu by switching off Show all notes in the top left hand corner of the screen.
Sorting notes
To sort the order of the notes:
- Click Sections > All Notes
- Click the Sort notes button
- Click on the note name and drag and drop it to a new position
- Sections > Financial position > Sort: will sort items within the face of the statement of financial position, restatement of comparatives note and deed of cross guarantee note
- Sections > All notes > Sort notes: will sort the notes to the financial statements
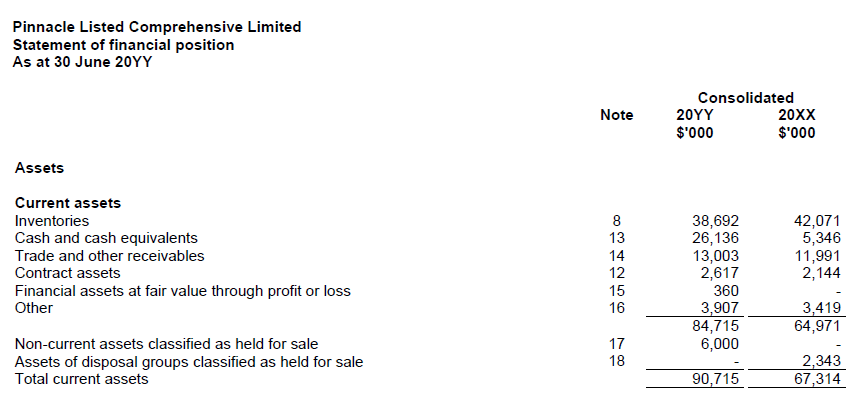
As an example in the image below:
- Cash and cash equivalents is not the first subclass
- The order of the notes is not sequential:

Change orientation of notes
To change the orientation of notes to the financial statements:
- Select a note from Sections > Notes > All notes. Alternatively, under Sections > Notes, select a note from a category in the navigation menu
- Click Orientation
- Select Portrait or Landscape
Include notes in contents page
To include the notes to the financial statements in the contents page of the report:
- Click Sections > Sections setup
- Click the edit icon next to the Contents section
- Set Include notes in contents page to Yes
Note: If a page break has been inserted at the beginning of the note, when the report is output, the note will start on a new page and the software will insert the wording 'continued' in the page header. As a result, for the Include notes in contents page option, if Yes is selected, the note name will be excluded from the contents page. To avoid this issue, the page break should be inserted at the end of the previous note.
Add a notes contents page
To add a separate contents page for notes to the financial statements:
- Click Sections > All Notes
- Click the Settings button
- Click Yes - With contents page for the Print notes option
- This can also be turned on or off in Sections setup by selecting Yes - With contents page in print section for Notes to the financial statements
Note: If a page break has been inserted at the beginning of the note, when the report is output, the note will start on a new page and the software will insert the wording 'continued' in the page header. As a result, for the Print notes option, if Yes - With contents page is selected, the note name will be excluded from the notes contents page. To avoid this issue, the page break should be inserted at the end of the previous note.
Change contents page styles
To change the default styles of the contents page or notes contents page:
- Click Sections > Sections setup
- Click the edit icon in the Contents or Notes to the financial statements row (if Yes - with contents page) has been selected
- Set Tab leader to None or select a style
- Set Spacing to Single, 1.5 lines or Double
- Set Include notes in contents page to Yes or No
- Set Contents case to Default, Lowercase, Sentence case, Proper case, Uppercase or Capitalise first character
Note: If Insert page numbers in Styles is set to No, then Tab leader for both the contents and notes contents pages will be hidden.
Errors on the contents page
The most common cause of an error on the contents page is due to table of contents markers within a custom section Word document. Custom sections cannot contain table of contents markers.
- Open the custom section within Word
- Turn on the 'Show paragraph marks'
 option
 - Search for markers such as {TC...} or {TOC...} and delete the markers
- Replace the existing custom section as per the instructions in Sections setup
Change the note name format
To change the note name format:
- Click the Report options cog
- Search for Include 'Note' before note number or Note name format - Include subclass in the financial position notes
- Set to Yes or No
Alternatively:
- Click Sections > All Notes
- Click the Settings button
- Set Include 'Note' before note number or Include subclass in the financial position notes to Yes or No
These control the note name format as follows:
| Include 'Note' before note number | Include subclass in the financial position notes | Example |
|
On |
On |
Note 9. Current assets - cash and cash equivalents |
|
On |
Off |
Note 9. Cash and cash equivalents |
|
Off |
On |
9. Current assets - cash and cash equivalents |
|
Off |
Off |
9. Cash and cash equivalents |
Combining current and non-current notes
- Click the Report options cog
- Search for Combine notes by class
-
Select:
- Yes - Without total or;
- Yes - With total
Click here to see which notes will combine. There is no option to 'pick and choose' pairings.
Combining other notes
In the Report options cog turn on the following options to combine notes:
- Include accounting policies in relevant note
- Include income tax in one note
- Include derivatives in one note
- Include retirement benefit in one note
- Include provision movements in one note
- Include cash flow information in one note
- Include subsidiaries in the financial position note
- Include associates in the financial position note
- Include joint ventures in the financial position note
Blank lines at the end of sections/notes
By default, the software will insert a text block (which appears as a blank line in the report) at the end of sections and/or notes to separate them. If the section and/or note contains large tables or text blocks which span the entire page, the blank line will be pushed onto the next page. This results in the section/note header re-printing with the (continued) wording even though there is no relevant information on the next page.
To prevent the header from re-printing:
- Navigate to the affected note or section
- In the affected note/section, select Settings
- Under Print blank lines at end of section/note, select No
Space between notes
- Click Sections > All Notes
- Click the Settings button
- Select 1, 2 or 3 blank lines for Space between notes
Remapping balances within the supporting notes
It is possible to remap balances found within the Notes to the financial statements.
To remap balances in the supporting notes:
- Select the Link icon to be taken to the supporting note
- In the supporting note, select the Ellipsis next to the row containing the balance
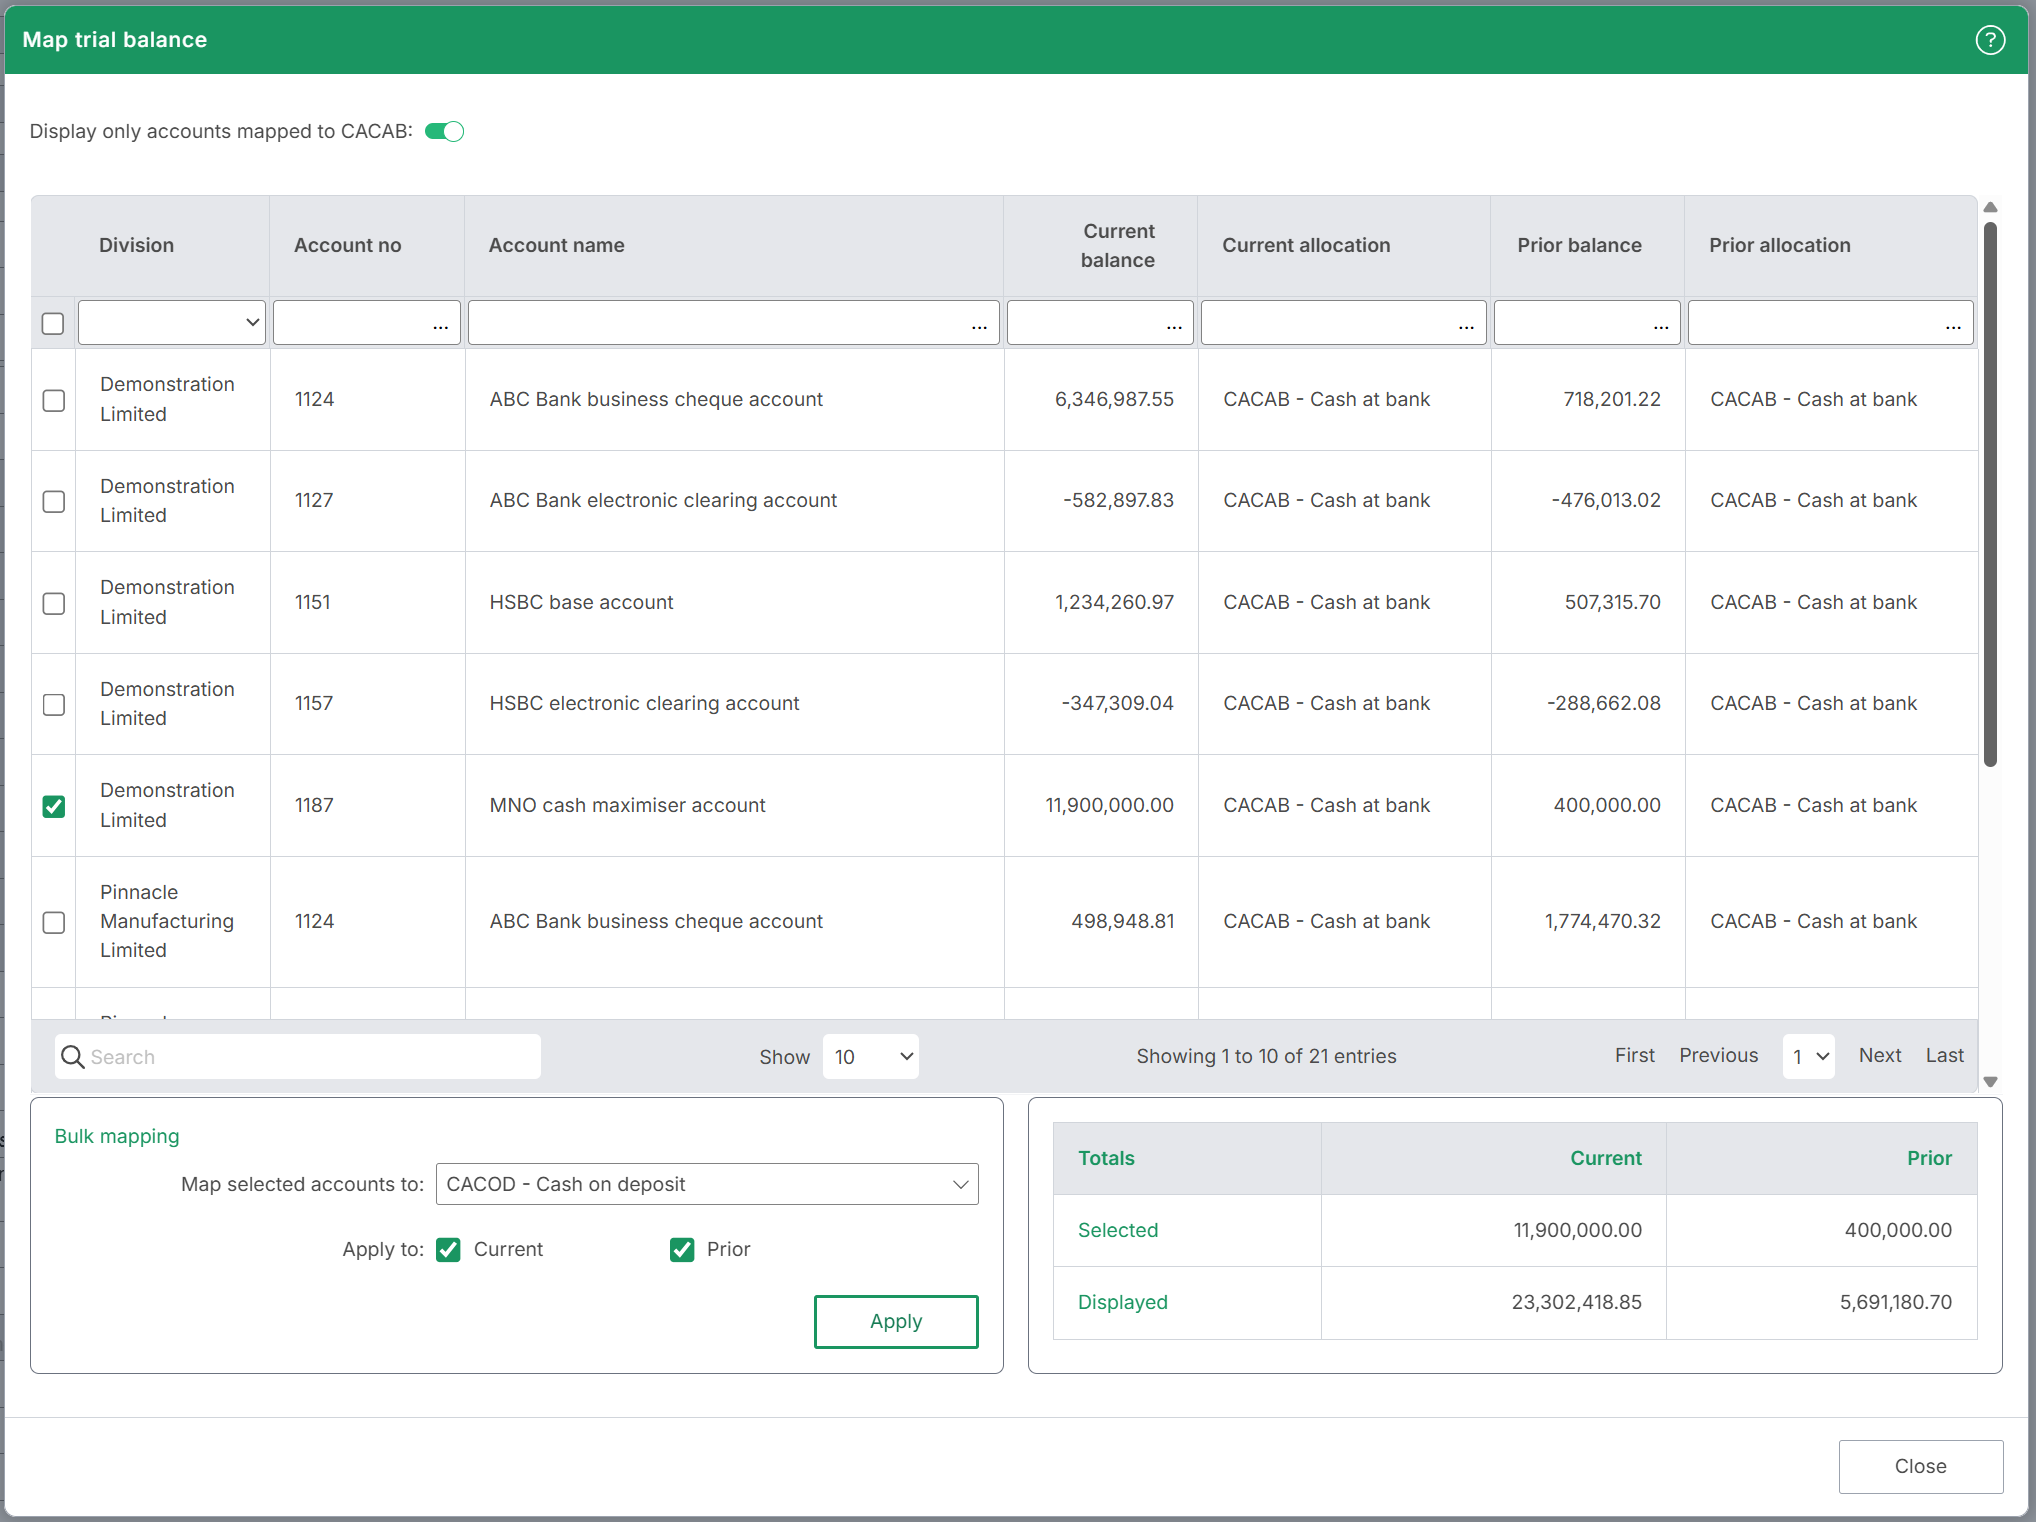
- Select Edit mapping
- Tick the balances which should be remapped. Under Displayed, the balance currently displayed for the selected allocation code will appear. As balances are ticked, the sum of these balances will appear under Selected.
- Under Bulk mapping, select the new allocation code from the drop down menu
- Tick which period to apply the changes to, either Current only, Prior only or both
- Select Apply

Within the Map trial balance window, it is possible to remap all trial balance accounts by setting Display only accounts mapped to ... to Off.