Report screens - understanding the options

Within each note the following information and options may be shown:
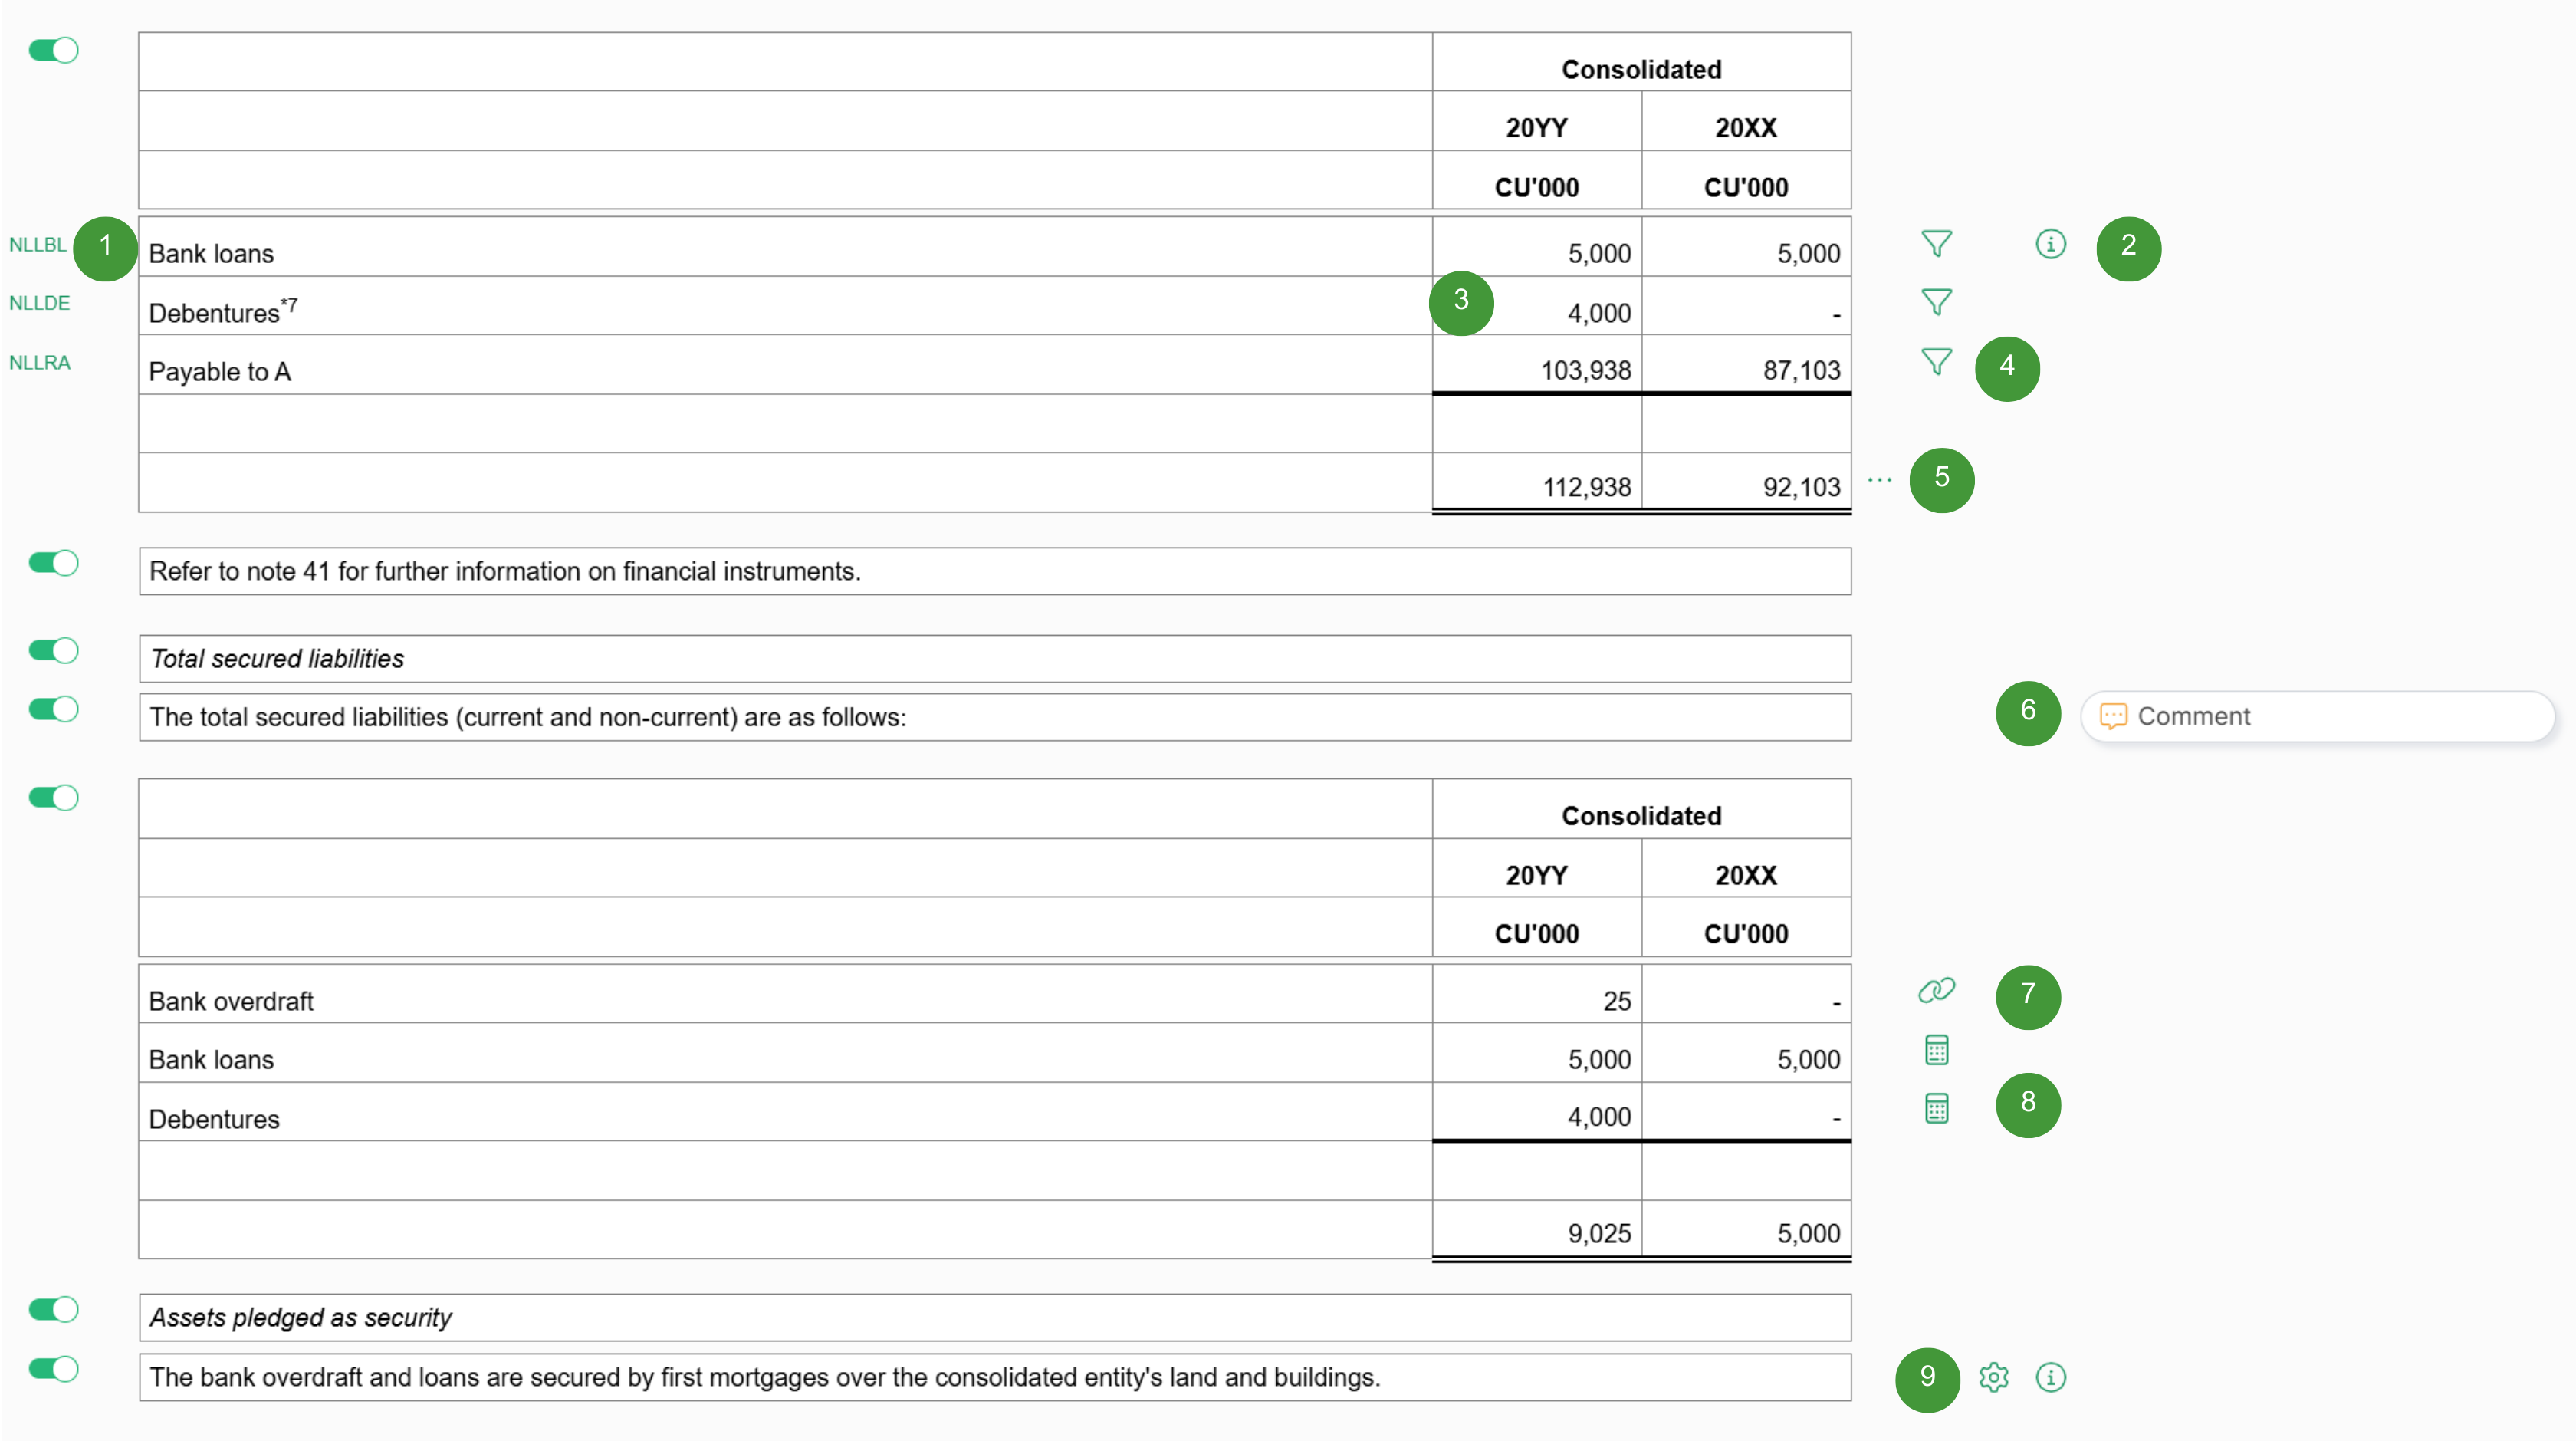
Image shows an excerpt of a Note screen from the software. The on-screen options have been labelled with numbers which correspond to the numbers in the table below.

Icon Option Function Notes
1

NLLBL

Audit Trail

Opens an audit trail

  • The 'Accurri Primary Chart of Accounts Codes' consist of five letters, for example CARTR where:
    • CA = Class (Current Assets)
    • R = Subclass (trade and other Receivables)
    • TR = Description (Trade Receivables)
  • A full list of codes is available here
2

Reference

Opens the source literature

  • Links will open to the correct page of the PDF. If Chrome downloads the PDF, instead of opening it, the setting can be changed (subject to any network restrictions and policies) in Chrome by going to chrome://settings/content/pdfDocuments and turning off the option 'Download PDF files instead of automatically opening them in Chrome'
3 -

Rounding

Round an account

  • Rounding adjustments can be applied in Chart of Accounts or directly in the table
  • Example from image above: Cell value is 4,000. If the cell was edited to 4,001. A rounding adjustment of 1 will be applied to NLLDE
4

Trial Balance

Opens the Trial Balance for the allocation

5

Comments

Add comments to paragraphs, tables and images

6

Linked

Opens the note the data is linked from

7

Calculated

Shows how the data is calculated in a tooltip

  • Hover the mouse over the icon to view the tooltip
8

Settings

Shows the options for the table or paragraph

  • Report options changed will impact the whole report
  • Users need rights to all report options to be able to edit using the settings icon
- -

Preview content

Turns preview on or off

  • Each report related screen also contains preview on and off buttons. Turn preview on to see all content that will print, turn preview off to see all available content.
- -

Reset sorting

Resets the sorting

  • Resets the sort order of paragraphs, tables, images, balance checks and page breaks with the note


Paragraphs

What would you like to do.... Follow these steps

Add new

  • Right click a paragraph, table or image
  • Select New > Paragraph below
  • Up to 5 additional paragraphs can be inserted. Additional paragraphs will have a keep with next setting of 'No' and the style set to 'Content'.

Alignment

Follow these steps: 

  • Click the paragraph
  • Select the text to edit
  • Select the desired alignment from the toolbar

Borders 

To add borders to paragraphs:

  • Select the desired paragraph
  • Select the desired border colour from the Border colour icon in the toolbar
  • Select the desired style from the Border style icon in the toolbar 
  • Select the desired border placement from the Border icon in the toolbar

To remove borders on paragraphs:

  • Select the Border icon in the toolbar
  • Select No Border

Only one colour can be selected for each paragraph. For example, it is not possible for a paragraph to have a red top border and a green bottom border, both the top and bottom borders must be red.

Delete

To delete a user inserted paragraph:

  • Right click a paragraph
  • Select Delete paragraph

Dependency

  • Some paragraphs have a dependency on another paragraph or table
  • For example, a paragraph above a table may turn on automatically when data exists in the table, or turn off when there is no data in the table
  • A dependency is overridden when the On/Off switch is changed by a user

To reset a dependency:

  • Click a paragraph
  • Click the Information (i) button
  • Click the Reset dependency button

Edit

  • It is recommended that each paragraph contains one paragraph of text
  • If required, Add new paragraphs

To allow paragraphs to split over multiple pages:

  • Click the paragraph
  • Click the Settings button
  • Set Allow break across pages to Yes
  • Set Allow break across pages to No to keep a paragraph on one page

Fields

  • Click the paragraph
  • Right mouse click where to insert the field
  • Select Insert field
  • Alternatively, click the Insert field button on the toolbar

To edit a field:

  • Double click it or;
  • Right mouse click the field and click Edit field or;
  • Click the Edit field button in the toolbar or;
  • Press the = key when in numeric cells

To delete a field:

  • Click the field, then press the delete key or;
  • Right mouse click the field and click Delete field

See Adding fields for more information.

Font

Follow these steps:

  • Click the paragraph
  • Select the text to edit
  • Select the desired font from the toolbar

Font size

Follow these steps:

  • Click the paragraph
  • Select the text to edit
  • Select the desired font size from the toolbar

Formatting

Format text in paragraphs with:

  • Bold, Colour, Italic, Subscript, Superscript, Underline

Use Styles to change formats throughout the report.

Headers

The following keep with next options are available for all paragraphs:

  • No: Inserts a paragraph and should be used in most cases
  • Yes - no space: Normally used for headers. It inserts a paragraph and where possible the software will keep it and the following paragraph, table or image together, so they will not split across a page. There will be no blank line between the inserted paragraph and the next report item
  • Yes - space: Normally used for headers. It inserts a paragraph and where possible the software will keep it and the following paragraph, table or image together, so they will not split across a page. There will one blank line between the inserted paragraph and the next report item

A setting of 'Yes' would normally only be used to keep a paragraph and following image, table or paragraph from splitting across two pages. Inserting many consecutive paragraphs with a setting of Yes - no space or Yes - space could result in issues with page breaks as it has been instructed to keep the content together when it cannot fit on a page.

Move

To move a paragraph to another place within the same note:

  • Right click the paragraph
  • Click Move > Paragraph to a new position
  • Right click a different paragraph, table, image, balance check, page break
  • Click Move > Selected paragraph below or Cancel

Reset

To reset a paragraph to the default text:

  • Right click the paragraph
  • Select Reset > Paragraph

Shading

To insert background shading for paragraphs:

  • Select the desired paragraph
  • Select the Shading icon in the toolbar 
  • Select the desired colour

Styles

To change the style:

  • Click a paragraph
  • Click the Information (i) button
  • Select the required Style


Styles work in the same way as styles in Word.


Tables

What would you like to do....  Follow these steps

Add new

  • Right click a paragraph, table or image
  • Select New > Table below

The following table types can be added. Click on any table type for further help:

Alignment

For horizontal alignment, follow these steps: 

  • Click the table
  • Select the cell to edit
  • Select the desired horizontal alignment from the toolbar

For vertical alignment, follow these steps: 

  • Click the table
  • Select the cell to edit
  • Select the desired vertical alignment from the toolbar

AutoSum

This option is only available when groups of cells have been selected.

To AutoSum columns:

  • Click the table
  • Select a group of cells to sum by using SHIFT plus click
  • Click Insert field from the toolbar
  • Select the desired position of the Formula fields being inserted, either Below, Right or Both
  • Select the tickboxes above the columns to include them in the total formula

To AutoSum rows:

  • Click the table
  • Select a group of cells to sum by using SHIFT plus click
  • Click Insert field from the toolbar
  • Select the desired position of the Formula fields being inserted, either Below, Right or Both
  • Select the tickboxes next to the rows to include them in the total formula

When selecting the desired position of the Formula fields being inserted, the Right and Both options will be disabled if the column to the right of the selection is not editable or if the column has the wrong data type selected (for example, if the column data type is Text).

If the row below the selection is not editable, the Below and Both options will be disabled.

Borders

To add borders to table cells:

  • Select the desired cells
  • Select the desired border colour from the Border colour icon in the toolbar
  • Select the desired style from the Border style icon in the toolbar 
  • Select the desired border placement from the Border icon in the toolbar

To remove borders in table cells:

Only one colour can be selected for each cell. For example, it is not possible for a cell to have a red top border and a green bottom border, both the top and bottom borders must be red.

When applying a border to an entire table or row, ensure Print table delimiter columns is set to No to avoid gaps in horizontal borders when the report is output.

To avoid a table header gap when applying a border to an entire table, ensure Print gap after table header is set to Off

Cell suffix

Only Chart of Accounts description cells can have a suffix added. A cell suffix will not show when editing a table and will not show in audit trails.  Cells with a cell suffix will have an icon to the left of the cell.

Insert or edit suffix:

  • Click the table to edit
  • Click a cell to add a suffix to
  • Click the Insert/Edit suffix button on the toolbar
  • Alternatively, right click the cell and select Insert/Edit suffix
  • Edit the suffix as required, formatting can be mixed
  • Click the Save button


Delete suffix:

  • Click the table to edit
  • Click a cell with a suffix
  • Click the Edit suffix button on the toolbar
  • Alternatively, click the Edit suffix icon to the left of the row
  • Delete the text and click the Save button
  • Alternatively, right mouse click the cell and select Delete suffix

Copy

To copy a user inserted table:

  • Right mouse click the table
  • Select Copy > Table (only table is copied) or Copy > Table and contents (both table and its contents is copied)
  • Right click a different paragraph, table, image, balance check
  • Click Paste table below

User inserted tables can be copied from any note or section, and pasted into any note or section.

NOTE: XBRL tags are not copied.

Delete

To delete a user inserted table:

  • Right mouse click the table
  • Select Delete table

To delete the content of multiple cells:

Deletions will be permanent once the table has been saved.

Dependency

  • Some tables have a dependency on another table
  • For example, a bullet point below a reconciliation table may turn on automatically when data exists in the reconciliation table, or turn off when there is no data in the table
  • A dependency is overridden when the On/Off switch is changed by a user

To reset a dependency:

  • Click a table
  • Click the Information (i) button
  • Click the Reset dependency button

Edit

  • Click a table to edit it
  • Editable cells have a green triangle in the top left hand corner
  • It is recommended to use fields when editing table headers

Edit column widths

  • Right click the table
  • Select Edit column widths
  • Alternatively, click the Column widths button on the toolbar
  • Enter the % of the total width of the table to assign to each column

The width of column 1 is automatically calculated. Only columns which will print can have their widths edited.

The following options in Styles allow an increased printable area:

  • Changing the margin sizes (Smaller margins means the columns will be wider)
  • Changing the font sizes

Export table

To export a table to Excel:

  • Right click the table
  • Select Export table
  • If the table is not named, add a name

Fields

  • Click the table
  • Right mouse click the cell to insert the field into
  • Select Insert field

To edit a field:

  • Double click it or;
  • Right mouse click the field and click Edit field or;
  • Click the Edit field button in the toolbar or;
  • Press the = key when in numeric cells

To delete a field:

  • Click the field, then press the delete key or;
  • Right mouse click the field and click Delete field

See Adding fields for more information.

Font

Follow these steps:

  • Click the table
  • Select the cells to edit
  • Select the desired font from the toolbar

Font size

Follow these steps:

  • Click the table
  • Select the cells to edit
  • Select the desired font size from the toolbar

Force row to print

  • Click the table to edit
  • Right click the row to be forced to print
  • Select Force row to print
  • The background colour of the row will turn white
  • To turn off, right click the row and select Force row to print
  • Alternatively, click the row be forced to print and then click the Force row to print button on the toolbar

Multiple rows can be forced to print at the same time by Selecting multiple cells first.

Formatting

Format text and cells with:

  • Bold, Colour, Italic, Subscript, Superscript, Underline


The cell type determines how formatting can be applied:

  • Editable text cells, excluding Chart of Accounts descriptions, can have formatting partially applied. e.g. sample text
  • For other cell types formatting applies to the whole cell

Use Styles to change formats throughout the report.

Print zero as blank - By default zero values will print as a hyphen (-). Cells can be selected and formatted to print zeros as blanks.

  • Click the table to edit
  • Select the cells to print zeroes as blanks
  • Click the Print zero as blank button

If a number exists in a cell, it will print even if the cell has been set to print zero as a blank.

Insert data from Excel

  • Select a range of cells in Excel and copy
  • Click the cell within the table where the first value should be pasted
  • Press CTRL+V
  • Data validation rules will validate the data being pasted, to ensure it is the same block size or alpha characters are not being pasted into a numeric cell or locked cells are not being pasted into

Move

To move a table to another place within the same note:

  • Right click the table
  • Click Move > Table to a new position
  • Right click a different paragraph, table, image, balance check, page break
  • Click Move > Selected table below or Cancel

Page breaks

To insert a page break within a table:

  • Click the table to edit
  • Right click a row
  • Click Insert page break before row

To remove a page break within a table:

  • Click the table to edit
  • Right click the row below the page break
  • Click Delete page break before row

Reset

Reset all table content:

  • Right click the table
  • Select Reset > Table

Reset selected table cells:

  • Click the table to edit
  • Select the cell or cells to be reset
  • Right click the cell selection
  • Select Reset > Content

Resetting will:

  • Reset all descriptions within the table back to what they would have been if no descriptions had been edited
  • Delete any manual figures entered

Select multiple cells

To select a block of cells:

  • Click the table to edit
  • Click a starting cell
  • Hold SHIFT on the keyboard
  • Click the last cell

To select a row, column or an entire table:

  • Click the table to edit
  • Right click a row, column or the table
  • Select Select >  RowColumn or Table

Copy and paste selected cells:

  • Press CTRL+C
  • Click the cell within the table where the first value should be pasted
  • Press CTRL+V
  • Data validation rules will validate the data being pasted, to ensure it is the same block size or alpha characters are not being pasted into a numeric cell or locked cells are not being pasted into

Settings

To change a settings of a user inserted table:

  • Click the table
  • Click the Settings button

Shading

To insert background shading for cells:

To further customise shading, it is also possible to:

Sort columns

Columns can be sorted within a table:

  • Click the table
  • Click Sort columns
  • Click the arrows above each column to sort the columns

Reset sorting:

  • Right click a table
  • Select Reset > Sorting

When Reset > Sorting is selected, both columns and rows will be reset.

When a report is rolled forward sorting will not roll.

Note: When a table is exported to Excel and the sort order of the table is changed in Accurri, the table will not import with Disclosures due to the different sort order.

Sort rows

Rows can be sorted within a group:

  • Click the table
  • Right click the row within a group to sort
  • Click Sort rows
  • If Sort rows is disabled or not shown, the row cannot be sorted
  • Alternatively, click the row then click the Sort rows button on the toolbar


There are 2 methods for  sorting:

  • Drag and drop a selected row to the chosen destination
  • Click the buttons above each column to sort columns in ascending or descending order. Blank text cells are sorted to the bottom of the group


Reset sorting:

  • Right click a table
  • Select Reset > Sorting

When Reset > Sorting is selected, both columns and rows will be reset.


When a report is rolled forward sorting will not roll.

Note: When a table is exported to Excel and the sort order of the table has been changed in Accurri, the table will not import with Disclosures due to the different sort order.

Split

In November 2023, report outputs were streamlined allowing the following new features:

A consequence of this update, is that tables which span more than one page may have a blank page before it. Microsoft Word tries to keep the table together by moving it to a new page. To resolve this, such tables should be set to Allow break across pages - Yes.

To split tables across pages:

  • Click the table
  • Click the Settings button
  • Select Yes for the Allow break across pages option

Styles

Styles can be used to control the formatting of all tables in the report, for example, making all table headers bold.

To change a table header style:

  • Click the table
  • Click the Settings button
  • Select a header style

Turn columns off

  • Click the table to edit
  • Click the on/off switch above the column
  • Alternatively, delete all values from the column and delete any text in the column header


Comments

What would you like to do....  Follow these steps

Add new

  • Right click a paragraph, table or image
  • Select Comments

Alternatively, for a paragraph or table:

  • Click the paragraph or table to edit it
  • Click the Comments button

View

If a paragraph, table or image has a comment, an icon will be displayed to the left of the paragraph, table or image:

  • The icon will be orange when the comment is unresolved
  • The icon will be green when the comment is resolved
  • Hover the mouse over the icon to see a preview of the comment

To view all comments within a report (See Comments for more information on the module):

  • Click Modules Comments

Edit

  • Click the comment icon or right click a paragraph, table or image and select Comments
  • Alternatively, click the Comments button on the toolbar when editing a paragraph or table
  • Click the New button to add a new comment in the group
  • Click the Delete all button to delete all comments in the group
  • Click Resolved to mark the comment as resolved or unresolved
  • Click the red delete icon to the right of an individual comment to delete it
  • Click the Save button to save any changes
  • Click the Cancel button to cancel any changes

Turn on or off

  • Click Outputs
  • Click the Settings button
  • Click Print comments to turn on or off as required (This setting only applies to sections and notes exported within the report. To download the entire report with comments download the 'Report (Comments)' in the required format in Outputs,  To download the entire report without comments download the 'Report' in the required format in Outputs.)


Balance checks

What would you like to do....  Follow these steps

Add new

  • Right click a paragraph, table or image
  • Select New > Balance check below
  • Select the Source table for the first cell value in the balance check. (Tip: Only tables which are named will appear in the Source list. To name a table, click it, type in a name and click Save.)
  • Click the cell to use for the first value
  • Click the Next button
  • Select the Source table for the second cell value in the balance check
  • Click the cell to use for the second value
  • Select the Calculation option:
    • Subtraction - the second cell value is subtracted from the first cell value, or;
    • Addition - the second cell value is added on to the first cell value
  • Edit the wording for the balance check warning
  • Click OK to insert the balance check

Review balances

  • Click on the balance check text

Edit

  • Right click the balance check
  • Click Edit balance check
  • Alternatively, click the settings icon to the right of the check

Delete

  • Right click the balance check
  • Click Delete balance check

Move

To move a balance check to another place within the same note:

  • Right click the balance check
  • Click Move > Balance check to a new position
  • Right click a different paragraph, table, image, balance check, page break
  • Click Move > Selected balance check below or Cancel

Turn on or off

  • Click the switch next to the balance check


Images

What would you like to do....  Follow these steps

Add new

  • Right click a paragraph, table or image
  • Select New > Image below
  • Select the image alignment: Left, Centred or Right
  • Select the file to use for the image, either a PNG or a JPG. Maximum file size is 2 MB
  • Click OK

If a paragraph and the following table, paragraph or image are linked and therefore have been told to stay together it will not be possible to break this link by adding an image between them.

Alignment

  • Right click the image
  • Click Edit image
  • Select a new alignment
  • Click OK

Change image

  • Right click the image
  • Click Edit image
  • Select a new file
  • Click OK

Move

To move an image to another place within the same note:

  • Right click the image
  • Click Move > Image to a new position
  • Right click a different paragraph, table, image, balance check, page break
  • Click Move > Selected image below or Cancel

Preview

  • Click the image
  • A preview is shown

Delete

  • Right click the image
  • Click Delete image

Images could be used for photos, graphs, or an image of a complex table. To ensure the best possible result when inserting an image of a table:

  • If taking a snip of the table from Word, ensure the Word zoom is set at 100%
  • Ensure the image contains as little white space as possible around the outside
  • Do not resize the image in any way, have the table in Word the correct size
  • Save the image as a PNG file type

Images are added without any scaling, meaning they are placed in the report 'as is'. If the image is too large to fit on an A4 page, with the current margin settings, a warning will be displayed and it will be rejected. The image will need to be reduced in size and uploaded again. If the report margins are changed after an image has been added and that image no longer fits on the page, the image will be cropped in the output.

There are no options to rotate, crop, edit or resize images as we believe such actions are better handled in an image editor.

The image resolution will make a difference to the image print width, for example:

  • Image one - width is 700 pixels. Resolution is 96 pixels per inch = 7.29 inches print width
  • Image two - width is 700 pixels. Resolution is 72 pixels per inch = 9.72 inches print width


Even though both image widths are 700 pixels, image two would not fit on the page as the print width is too wide for an A4 piece of paper.


Page breaks

What would you like to do....  Follow these steps

Add new

  • Right click a paragraph, table or image
  • Select New > Page break after

Delete

  • Right click the page break
  • Select Delete page break

Move

To move a page break to another place within the same note:

  • Right click the table
  • Click Move > Page break to a new position
  • Right click a different paragraph, table, image, balance check, page break
  • Click Move > Selected page break below or Cancel


Download a note or section

What would you like to do....  Follow these steps

Download

  • Click the Send to PDF or Send to Word buttons


Bookmark a page

What would you like to do....  Follow these steps

Set bookmark

  • Click the User initials icon or click the Ellipsis icon in the top-right-hand corner of the screen
  • Click the Bookmark menu
  • Click Set bookmark or Update bookmark

Jump to bookmark

  • Click the User initials icon or click the Ellipsis icon in the top-right-hand corner of the screen
  • Click the Bookmark menu
  • Click Go to bookmark

Any screen within a report can be bookmarked to enable it to be accessed again quickly.


Spell check

What would you like to do....  Follow these steps

Check spelling

  • Hold down the CTRL key
  • Right click the unrecognised word

Spell check and the language is controlled by the browser not Accurri. Chrome shows unrecognised words underlined in red.


Reset note name

What would you like to do....  Follow these steps

Reset name to default

  • Right click the note name
  • Select Reset > Note name


Start note on new page

What would you like to do....  Follow these steps

Start a note on a new page 

  • Click the note
  • Click Settings 
  • Select the Start note on new page setting, either Yes or No