Video help
In this video:
- Creating divisions
- Importing Trial Balances
- Adjustments
- Chart of Accounts
- Audit Trails
Jump to a specific point in the video with the chapters button in the video.
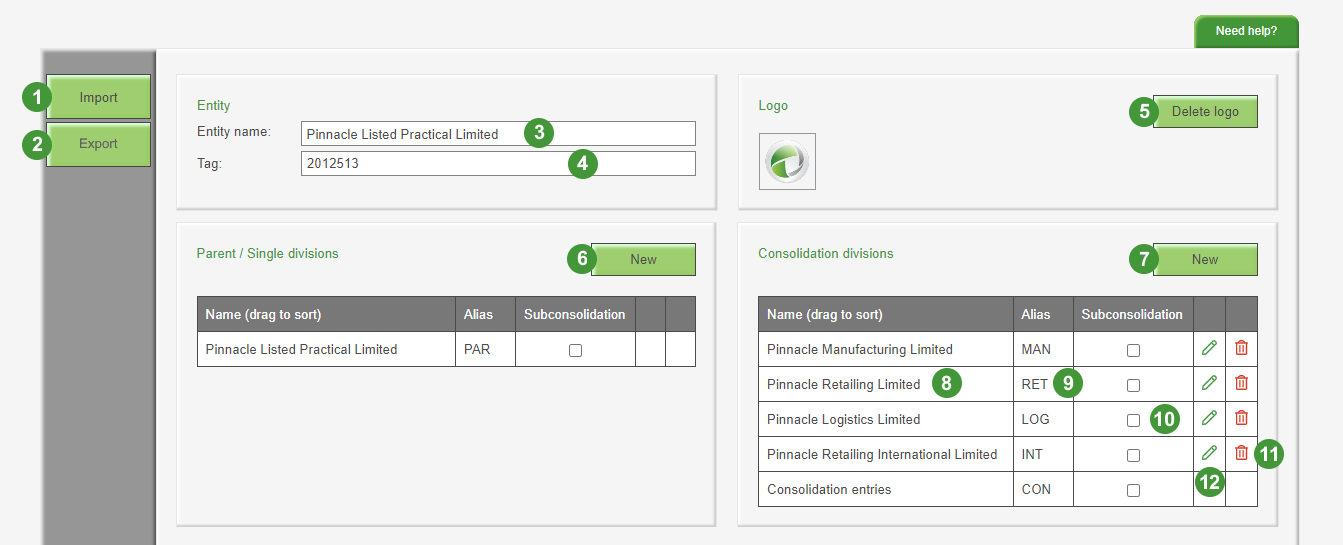
Edit entity features
| Option | Function | Notes | |
| 1 |
Import |
Import a list of divisions from Excel |
|
| 2 |
Export |
Export a list of divisions to Excel |
|
| 3 |
Entity name |
Click to edit |
|
| 4 |
Tag |
Set a tag for the entity, such as a reference or company number |
|
| 5 |
Import / Delete logo |
Imports or deletes a logo for reports |
|
| 6 |
New Parent / Single division |
Add a new parent / single division |
|
| 7 |
New consolidation division |
Add a new consolidation division |
|
| 8 |
Displays the division name |
|
|
| 9 |
Displays the division alias |
|
|
| 10 |
Subconsolidation |
Tick to include the division in a subconsolidation |
|
| 11 |
Delete division |
Delete a division |
|
| 12 |
Edit division |
Edits a division |
|
Divisions
Divisions are used by all reports within an entity and any changes made to divisions will affect all reports, even if a report is locked.
In nearly all cases, a division represents a unique Trial Balance. Note: This is not where Trial Balances are imported.
To import a Trial Balance:
- Open or create a report. See Creating new reports
- To import a Trial Balance, see Trial Balance
Add new Divisions
Parent / Single divisions
Where multiple Trial Balances form a single entity, a division for each Trial Balance should be created within Parent / Single divisions.
To add Parent / Single divisions:
- Click Entities > Edit
- Click New within Parent / Single divisions
- Add a Division name
- Add a Division alias
- If required, set where the division should be inserted
- Click OK
Consolidation divisions
To add Consolidation divisions:
- Click Entities > Edit
- Click New within Consolidation divisions
- Add a Division name
- Add a Division alias
- If required, set where the division should be inserted
- Click OK
Sort divisions
- Divisions can be sorted in any order by dragging and dropping to a new position, including dragging between the Parent / Single and Consolidation groups
- The divisions order will also appear elsewhere, such as Adjustments and Audit Trail outputs
Divisions import
To import multiple Divisions from an Excel file:
- Click Entities > Edit
- Click Import
- Select the file to import
- Click OK
Divisions are always imported to the Consolidation divisions group but can be moved to the Parent / Single divisions group by dragging them to the Parent / Single divisions group.
The required format of the import file is:
| Column A | Column B | |
|
Column |
Division name |
Division alias |
|
Required |
Required |
Required |
|
Notes |
150 characters maximum length |
2, 3 or 4 characters |
The following image shows a valid sample file:

Import issues
- The only valid file type that can be uploaded is an Excel file
- Ensure the Division name is in column A, starting in cell A1
- Ensure the Division alias is in column B, starting in cell B1
- The filename is greater than 100 characters in length. Change the filename so it is less than 100 characters in length
- The Excel file is password protected
- The Excel file contains links to an external data source. Open the Excel file, click the Data tab and click Edit links to check for or remove links. Alternatively, copy and paste the divisions data into a new Excel file
Divisions export
To export multiple Divisions to an Excel file:
- Click Entities > Edit
- Click Export
Creating reports
To create a new report:
- Click Reports > List
- Click New report
- Enter a report version
- Click OK
The following frequently asked questions may help with creating new reports: