Video help
Customising text, tables and fieldsCustomising text, tables and fields
- Insert Word documents
- Insert notes
- Edit paragraphs
- Insert paragraphs
- Move paragraphs
- Insert fields
- Insert custom variables
- Insert tables
- Insert balance checks
- Insert images
Jump to a specific point in the video with the chapters button in the video.
Adding tables to a report
- Right click an existing paragraph, table, image or page break
- Select New > Table below
All tables that are added must be named. We recommend a descriptive name for the table.
If more complex tables are required tables could be inserted as an image.
Adding a Bullet point table
- Table name - a descriptive name for the table and its contents
- Allow break across pages - if Yes is selected the table contents will split across pages if required
- Clear contents on roll forward - if Yes is selected the table contents will be deleted in the rolled report
- Bullet type - select either Alpha, Asterisk, Dot, Numeric or Roman numeral
- Number of rows - the number of data rows for the table. Available rows are dependent on the bullet type. 1 to 26 for alpha and dot and 1 to 3 for asterisk, 1 to 50 for numeric and 1 to 10 for Roman numeral
Table header
Bullet point tables do not have a table header and a header cannot be added to them.
Column widths
- Right click the table
- Select Edit column widths
- Enter the % of the total width of the table to assign to each column
The width of column 1 is automatically calculated. Only columns which will print can have their widths edited.
Roll forward
The table contents will be cleared when a report is rolled forward, if Clear contents on roll forward is set to Yes.
Pasting data
To copy and paste bullet point lists from Microsoft Word, hold down the ALT key while selecting the text to be copied in Microsoft Word. This will select the text only and enable a list to be pasted directly into a bullet point table in the software.
Adding a Current and prior table
- Table name - a descriptive name for the table and its contents
- Allow break across pages - if Yes is selected the table contents will split across pages if required
- Header - select to use either the Income statement or the Statement of financial position header. If no header is required, select No
- Header style - select to use either the Main table or Sub table header Styles
- Unit header - adds a unit header row in the table header
- Column setup - select from Currency, Numeric or Percentage for the column data type. For numeric and percentage data types, select the number of decimal places to show
- Introduction - adds a bold text row as the first row and a spare text row as the second row for each group
- Note reference column - adds a note reference column
- Group 1 number of rows - the number of data rows for the group between 1 and 50
- Group 1 subtotal row - if a subtotal is required, setting to Yes will enable group 2
- Group 2 number of rows - the number of data rows for the group between 1 and 15
- Group 2 subtotal row - if a subtotal is required, setting to Yes will enable group 3
- Group 3 number of rows - the number of data rows for the group between 1 and 15
- Group 3 subtotal row - if a subtotal is required
- Total row - adds a total row as the last row of the table
Table header
The wording and period headers and rounding are controlled by Settings.
Column widths
- Right click the table
- Select Edit column widths
- Enter the % of the total width of the table to assign to each column
The width of column 1 is automatically calculated. Only columns which will print can have their widths edited.
Total underlines when the table has only one row
When there are two or more rows in the table, a total row can be added. The total will be underlined to denote this, depending on the column type.
If only one row is required and the underlines are also required:
- Set the number of rows in Group 1 to 2
- Set Total row to Yes
- Edit the table to have one row of data. The underlines will then print.
Roll forward
This table will be rolled automatically when a report is rolled forward. The current period will roll to the prior period and the current period will be cleared. There is no way to control this behaviour on a per table basis.
Adding a Current and prior with change % table
- Table name - a descriptive name for the table and its contents
- Allow break across pages - if Yes is selected the table contents will split across pages if required
- Header - select to use either the Income statement or the Statement of financial position header. If no header is required, select No
- Header style - select to use either the Main table or Sub table header Styles
- Introduction - adds a bold text row as the first row and a spare text row as the second row for each group
- Totals - total rows can include the percentage, With percentage or exclude the percentage, Without percentage
- Group 1 number of rows - the number of data rows for the group between 1 and 50
- Group 1 subtotal row - if a subtotal is required, setting to Yes will enable group 2
- Group 2 number of rows - the number of data rows for the group between 1 and 15
- Group 2 subtotal row - if a subtotal is required, setting to Yes will enable group 3
- Group 3 number of rows - the number of data rows for the group between 1 and 15
- Group 3 subtotal row - if a subtotal is required
- Total row - adds a total row as the last row of the table
Table header
Some of the table header cells are editable. The period headers and currency header are controlled by Settings.
Column widths
- Right click the table
- Select Edit column widths
- Enter the % of the total width of the table to assign to each column
The width of column 1 is automatically calculated. Only columns which will print can have their widths edited.
Decimal places
The number of decimal places for the percentage column is controlled by the Current vs prior option in Rounding.
Total underlines when the table has only one row
When there are two or more rows in the table, a total row can be added. The total will be underlined to denote this, depending on the column type.
If only one row is required and the underlines are also required:
- Set the number of rows in Group 1 to 2
- Set Total row to Yes
- Edit the table to have one row of data. The underlines will then print.
Roll forward
This table will be rolled automatically when a report is rolled forward. The current period will roll to the prior period and the current period will be cleared. There is no way to control this behaviour on a per table basis.
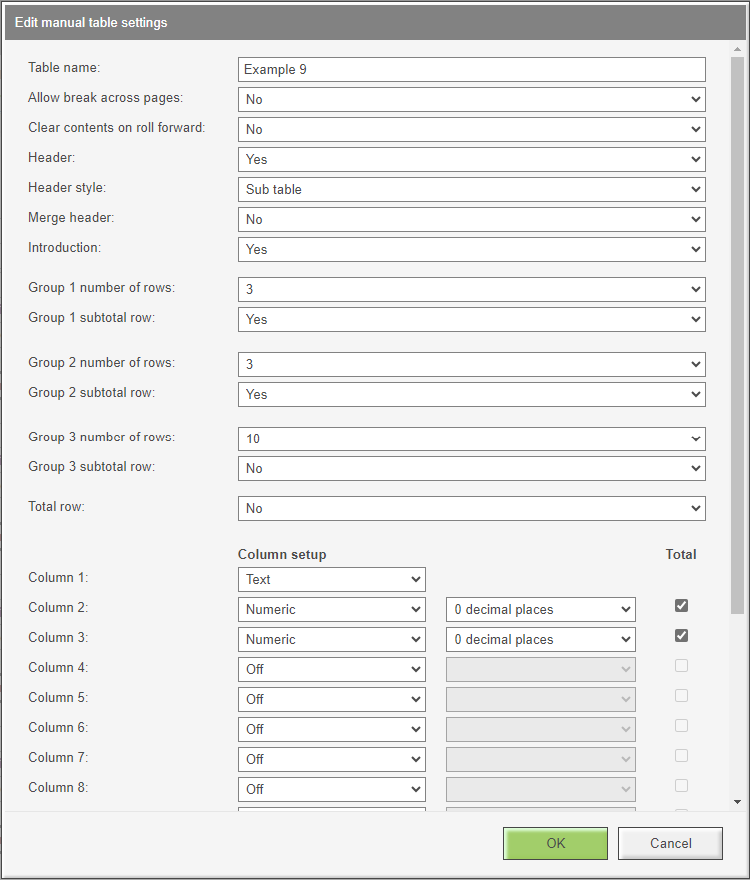
Adding a Manual table
- Table name - a descriptive name for the table and its contents
- Allow break across pages - if Yes is selected the table contents will split across pages if required
- Clear contents on roll forward - if Yes is selected the table contents will be deleted in the rolled report
- Header - if Yes is selected then a 3 row header is added to the table
- Header style - select to use either the Main table or Sub table header Styles
- Merge header - if Yes is selected then identical text in adjacent cells in the header will merge. Applies to the first used header row only.
- Introduction - adds a bold text row as the first row and a spare text row as the second row for each group
- Group 1 number of rows - the number of data rows for the group between 1 and 50
- Group 1 subtotal row - if a subtotal is required, setting to Yes will enable group 2
- Group 2 number of rows - the number of data rows for the group between 1 and 15
- Group 2 subtotal row - if a subtotal is required, setting to Yes will enable group 3
- Group 3 number of rows - the number of data rows for the group between 1 and 15
- Group 3 subtotal row - if a subtotal is required
- Total row - adds a total row as the last row of the table
- Currency - currency data type based on the rounding for the report
- Date - date data type
- Numeric - numeric data type that can be configured to between 0 and 5 decimals
- Percentage - percentage data type that can be configured to between 0 and 5 decimals followed by a % sign
- Price - numeric data type that can be configured to between 0 and 5 decimals, preceded by the report currency symbol
- Text - free text entry
Manual tables can have between 2 and 15 columns.
A total column can be added as the last column. Turning on a total column will disable column 15 as it is not possible to have a 15 column table, plus a total column. Likewise, turning on column 15 will disable the total column. To turn off a total column, untick all Total tickboxes.
Currency, Numeric, Percentage or Price data types can be added together in the total column. Only the same data type can be added together. Meaning for example, Currency and Numeric columns cannot be added together, but Currency and Currency columns can be added. To select columns to be added together in the total column, click the Total tickbox for the columns to be included.
There is no option to add Percentage or Price columns down the page.
Table header
Some of the table header cells are editable, depending on the column data type. The currency header is controlled by Settings.
Column widths
- Right click the table
- Select Edit column widths
- Enter the % of the total width of the table to assign to each column
The width of column 1 is automatically calculated. Only columns which will print can have their widths edited.
Rows in the first column not printing
Rows in the first column will only print if there is data on the same row of a type of currency, numeric, percentage or price. This means manual tables cannot have just text columns, or date columns, or a text column and a date column, as the first column would not print. A 'Text' table should be used for those two situations. A warning will be displayed if the table is setup in this way.
Total underlines when the table has only one row
When there are two or more rows in the table, a total row can be added. The total will be underlined to denote this, depending on the column type.
If only one row is required and the underlines are also required:
- Set the number of rows in Group 1 to 2
- Set Total row to Yes
- Edit the table to have one row of data. The underlines will then print.
Roll forward
The table contents will be cleared when a report is rolled forward, if Clear contents on roll forward is set to Yes. Note that a Current and prior table will roll forward.
Adding a Text table
- Table name - a descriptive name for the table and its contents
- Allow break across pages - if Yes is selected the table contents will split across pages if required
- Clear contents on roll forward - if Yes is selected the table contents will be deleted in the rolled report
- Header - if Yes is selected then a 3 row header is added to the table
- Header style - select to use either the Main table or Sub table header Styles
- Number of columns - the number of columns for the table between 1 and 20
- Number of rows - the number of data rows for the table between 1 and 50
Column widths
- Right click the table
- Select Edit column widths
- Enter the % of the total width of the table to assign to each column
The width of column 1 is automatically calculated.
Roll forward
The table contents will be cleared when a report is rolled forward, if Clear contents on roll forward is set to Yes.
Moving tables
To move a table to another place within the same note:
- Right click the table
- Click Move > Table to a new position
- Right click a different paragraph, table, image, balance check
- Click Move > Selected table below or Cancel
Copying tables
User added tables can be copied from any note or section, and pasted into any note or section.
To copy a user added table:
- Right click the table
- Click Copy > Table (only table is copied) or Copy > Table and contents (both table and its contents is copied)
- Right click a different paragraph, table, image, balance check
- Click Paste table below
Editing table settings
All user added tables can have their settings edited by right clicking the table and then left mouse clicking Edit settings, alternatively click the settings icon to the right of the table.
Deleting a table
All user inserted tables can be deleted by right mouse clicking the table and then left mouse clicking Delete table.
It is also possible to delete the content of multiple cells within a table.
All deletions are permanent.
Adding paragraphs to a report
- Right mouse click an existing paragraph, table, image or page break
- Select New > Paragraph below
- The edit paragraph box will be shown.
- No: This will insert a paragraph and should be used in most cases
- Yes - no space: This will insert a paragraph and the software will keep it and the following paragraph, table or image together, so they will not split across a page. There will be no blank line between the inserted paragraph and the next report item
- Yes - space: This will insert a paragraph and the software will keep it and the following paragraph, table or image together, so they will not split across a page. There will be one blank line between the inserted paragraph and the next report item
A setting of 'Yes' would normally only be used to keep a paragraph and following image, table or paragraph from splitting across two pages. Inserting many consecutive paragraphs with a setting of Yes - no space or Yes - space could result in issues with page breaks as it has been instructed to keep the content together when it cannot fit on a page.
- Content (Default)
- Main header
- Main sub header
- Sub header
These styles are linked to Styles and work in the same way as styles in Word.
Page breaks can be inserted within large paragraphs by selecting Allow break across pages - Yes.
Up to 5 additional paragraphs can be inserted. Additional paragraphs will have a keep with next setting of 'No' and the style set to 'Content'.
- Right click the paragraph
- Select Delete paragraph
- A deleted paragraph cannot be undeleted.
Moving paragraphs
To move a paragraph to another place within the same note:
- Right click the paragraph
- Click Move > Paragraph to a new position
- Right click a different paragraph, table, image, balance check
- Click Move > Selected paragraph below or Cancel
Examples - Tables
Example one
The following is an example of a manual table with three groups with subtotals and a grand total.

Which will produce the following output.

Example two
The following is an example of a manual table with two groups with subtotals and no grand total.

Which will produce the following output.

Example three
The following is an example of a manual table with two groups, one with a subtotal and one without and a grand total.

Which will produce the following output.

Example four
The following is an example of a manual table with three groups, with no subtotals and a grand total.

Which will produce the following output, which was achieved by pressing ENTER at the start of the cells containing 'Row 4' and 'Row 7'. This creates three separate groups, with no subtotals and a grand total.

Example five
The following is an example of a manual table with two groups, with subtotals and no grand total. It has Introduction set to Yes, which provides 2 rows above each group. In the image below only one of those rows has been used in each group for the text Introduction 1 and Introduction 2.

Example six
The following is an example of a manual table with one group, with a subtotal and no grand total. A bold header has been added by typing the header 'Example header 1', then pressing SHIFT + ENTER and then typing 'Row 1'. 'Example header 1' was then made bold. The same method was used for 'Example header 2'.

Example seven
The following is an example stacking 3 manual tables with different data types. The first table containing 'Row 1', 'Row 2', 'Row 3' and 'Total 1' has a header. The second table containing the 'Row 4' numbers has no header. The third table containing 'Row 5', 'Row 6' and 'Total 2' has no header.

Which will produce the following output.

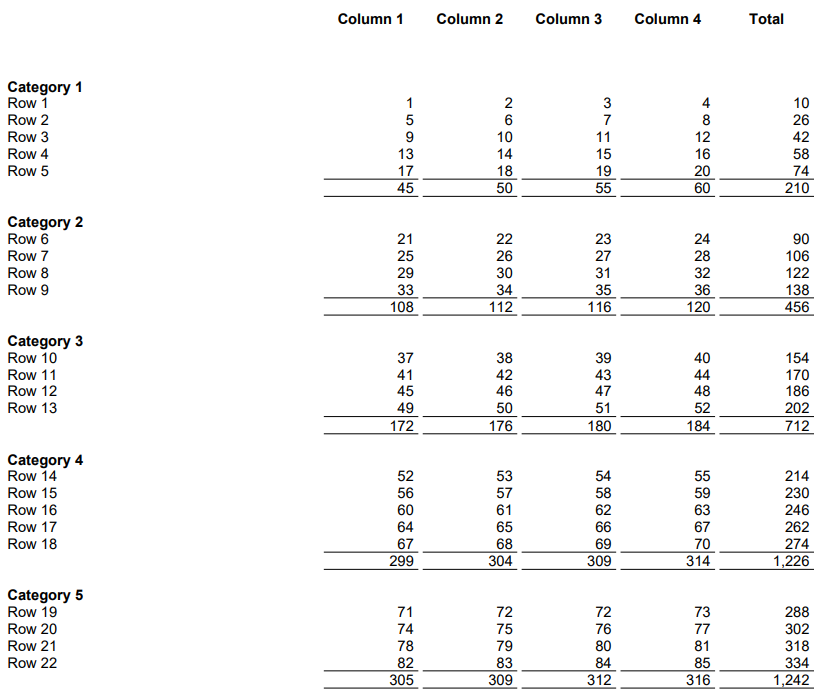
Example eight
The following is an example of stacking two manual tables to create the appearance of one table with five groups, each with their own subtotal. The first table containing 'Category 1', 'Category 2', and 'Category 3' has a header. The second table containing the 'Category 4' and 'Category 5' has no header.
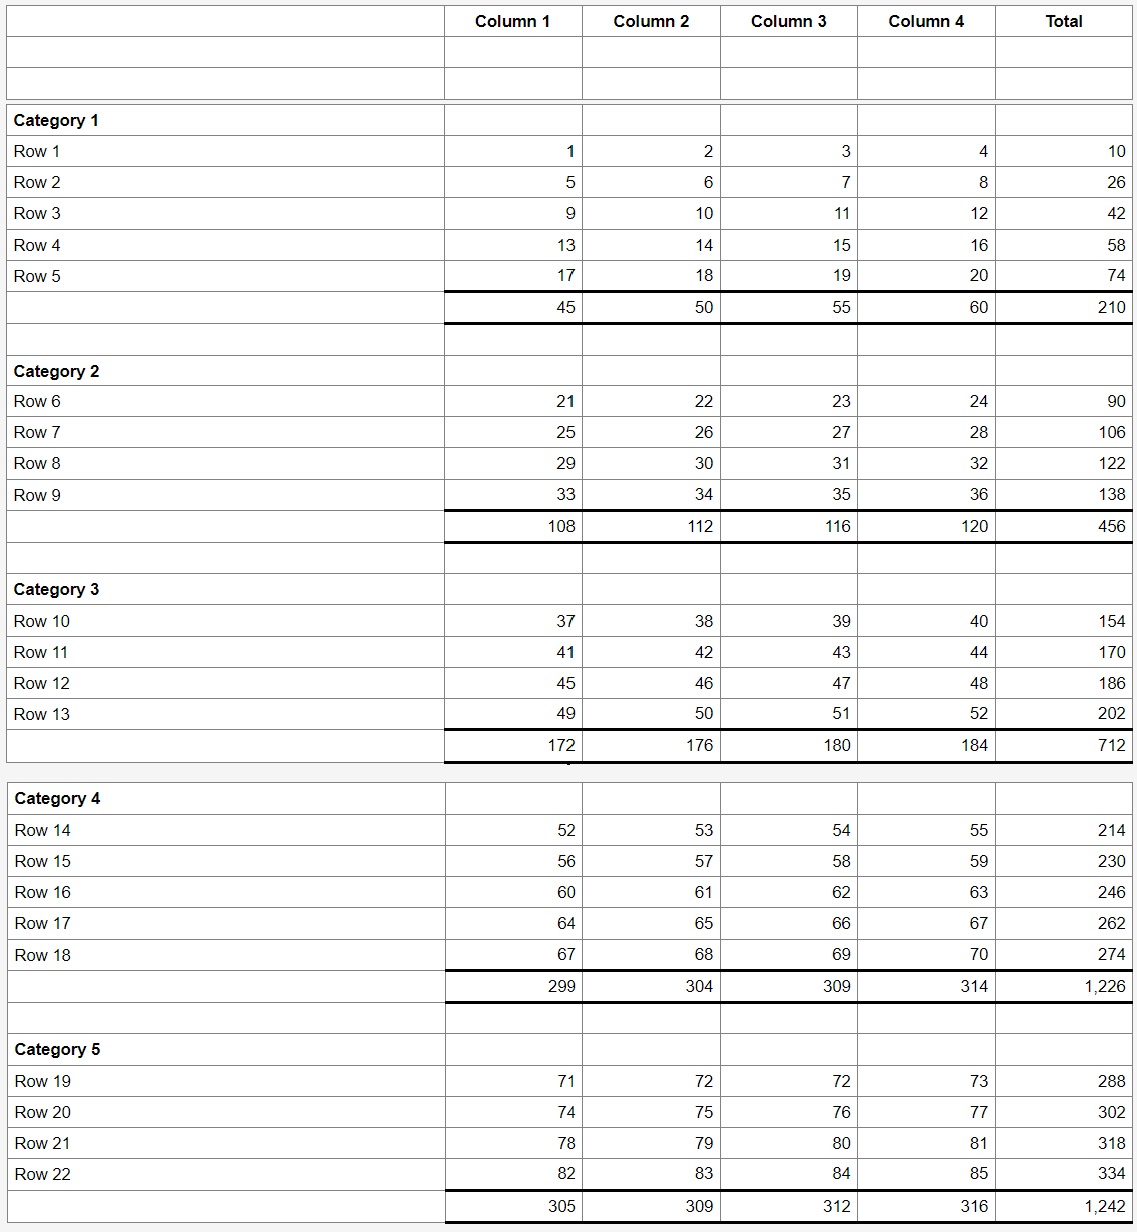
Which will produce the following output.
Example nine
The following is an example of a manual table with three groups. Group 1 and Group 2 have subtotals, while Group 3 has no subtotal. There is also no grand total.
Which will produce the following output.
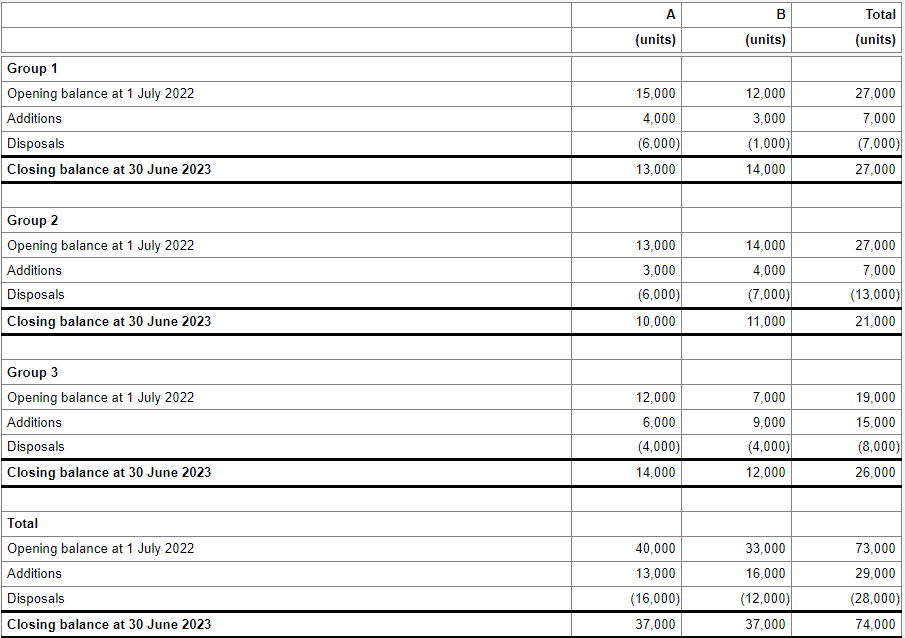
The closing balances for 'Group 3' were calculated using formula fields which summed the 3 rows above it (opening balance, additions and disposals). The row was then formatted using table borders to make it appear as a subtotal.
The balances in the 'Total' group were also calculated using formula fields which sum the opening balances, additions and disposals across all 3 groups. i.e. in the 'Total' group, the opening balance is the sum of the opening balances for Group 1, Group 2 and Group 3. The closing balance row for the 'Total' group was formatted using table borders to make it appear as a subtotal.